Tuesday, February 7, 2017
Dell XPS 17 L702X Setup Guide Free PDF Download
Dell XPS 17 L702X Setup Guide Free PDF Download
The Dell XPS 17 L702X Setup Guide has been released by Dell at their website. The Dell XPS 17 L702X Setup Guide is provided in PDF document format (110-pages, PDF, 2.1MB) that you can download directly from Dell website. You can read this Dell XPS 17 L702X Setup Guide by using PDF reader software/application. The Dell XPS 17 L702X Setup Guide contains complete reference information about specification and how to operate the Dell XPS 17 L702X PC properly, such as how to connect the ac adapter, how to install the simcard, how to connect to the internet, how to restoring the operating system, basic troubleshooting and many more.

Table Of Contents Dell XPS 17 L702X Setup Guide:
- Setting Up Your XPS Laptop
- Using Your XPS Laptop
- Solving Problems
- Using Support Tools
- Restoring Your Operating System
- Getting Help
- Finding More Information and Resources
- Specifications
- Appendix
- Index
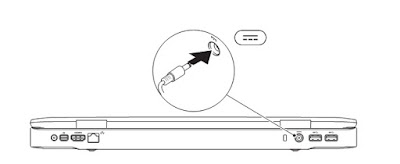
Connect to the AC Adapter:
Connect the AC adapter to the computer and then plug it into an electrical outlet or surge protector.
WARNING: The AC adapter works with electrical outlets worldwide. However, power connectors and power strips vary among countries. Using an incompatible cable or improperly connecting the cable to a power strip or electrical outlet may cause fire or permanent damage to your computer.

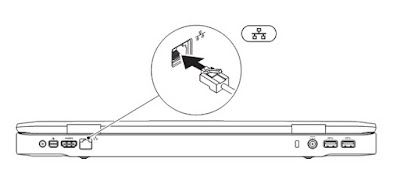
Connect the Network Cable (Optional)

Create System Recovery Media (Recommended):
The system recovery media can be used to restore your computer to the operating state it was in when you purchased the computer, while preserving data files (without the need of the Operating System disc). You can use the system recovery media if changes to the hardware, software, drivers, or other system settings have left the computer in an undesirable operating state.
You will require the following to create the system recovery media:
• Dell DataSafe Local Backup
• USB key with a minimum capacity of 8 GB or DVD ?R/DVD+R/Blu?ray Disc
You will require the following to create the system recovery media:
• Dell DataSafe Local Backup
• USB key with a minimum capacity of 8 GB or DVD ?R/DVD+R/Blu?ray Disc
To create a system recovery media:
1. Ensure that the AC adapter is connected (see “Connect the AC Adapter” on page 8).
2. Insert the disc or USB key in the computer.
3. Click Start ? All Programs? Dell DataSafe Local Backup .
4. Click Create Recovery Media .
5. Follow the instructions on the screen
1. Ensure that the AC adapter is connected (see “Connect the AC Adapter” on page 8).
2. Insert the disc or USB key in the computer.
3. Click Start ? All Programs? Dell DataSafe Local Backup .
4. Click Create Recovery Media .
5. Follow the instructions on the screen
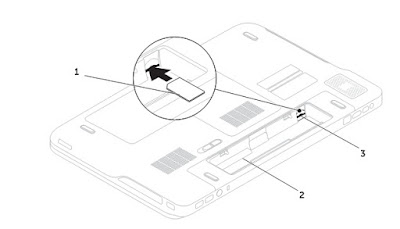
Install the SIM Card (Optional):
Installing a Subscriber Identity Module (SIM) card on your computer allows you to connect to the Internet. To access the Internet you must be within the network of your cellular service provider.
To install the SIM card:
1. Turn off your computer.
2. Remove the battery (see “Removing and Replacing the Battery” on page 52).
3. In the battery bay, slide the SIM card into the SIM card slot.
4. Replace the battery (see “Removing and Replacing the Battery” on page 52).
5. Turn on your computer.
To remove the SIM card, press and eject the SIM card.

1. SIM card
2. battery bay
3. SIM card slot
2. battery bay
3. SIM card slot
Right View Features of Dell XPS 17 L702X:

1. Optical drive — Plays or records CDs, DVDs, and Blu?ray Discs (optional). For more information, see “Using the Optical Drive” on page 46.
2. Optical drive light — Blinks when you press the optical drive eject button or when you insert a disc and it is being read.
3. Optical drive eject button — Opens the optical drive tray when pressed.
4. Emergency eject hole — Use to open the optical drive tray if it does not open when you press the eject button. For more information, see “Using the Emergency Eject Hole” on page 46.
5. Audio-out/Headphone connector — Connects to a pair of headphones or to a powered speaker or sound system.
6. Headphone/digital S/PDIF combo connector — Connects to amplifiers, speakers, or TVs for digital audio output. Can also be used to connect to a pair of headphones.
7. Audio-in/Microphone connector — Connects to a microphone or inputs signal for use with audio programs
Back View Features of Dell XPS 17 L702X:

1. Antenna-in connector (on supported models) — Connects to an external antenna (included) or coaxial cable (adapter included) to view programs using the TV tuner card (optional).
2. Mini-DisplayPort connector — Digital interface standard connector that connects to external DisplayPort monitors and projectors.
3. HDMI connector — Connects to a TV for both 5.1 audio and video signals.
4. Network connector — Connects your computer to a network or a broadband device if you are using a wired network.
5. Security cable slot — Attaches a commercially available security cable to the computer.
6. AC adapter connector — Connects to the AC adapter to power the computer and charge the battery.
7. USB 3.0 connectors (2) — Connect to USB devices, such as a mouse, keyboard, printer, external drive, or MP3 player. Provide faster data transmission between your computer and USB devices
The following download link is for Dell XPS 17 L702X Setup Guide. The setup guide s provided by Dell website. The Dell XPS 17 L702X Setup Guide offers comprehensive information about the PC that would be useful for any of you who are using this computer.
Download FREE DELL XPS 15 9550 Service Manual & Troubleshooting.pdf
Go to link Download