Saturday, January 7, 2017
Dell™ Inspiron™ N5010 M5010 Service Manual PDF Download
Dell™ Inspiron™ N5010 M5010 Service Manual PDF Download
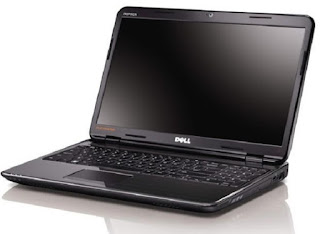
Dell™ Inspiron™ N5010/M5010 Service Manual PDF Download. Are you a Dell Inspiron N5010/M5010 owner? Do you have a problem with a Dell Inspiron N5010/M5010 laptop? Dont worry, this service manual Dell Inspiron N5010/M5010 maybe can help resolve your problem. Here is Dell Inspiron N5010/M5010 service manual or user service for you. This service manual is available online and you can download it directly from DELL official website. This service manual comes in 51 pages of PDFdocument format ( 1.3 MB ).

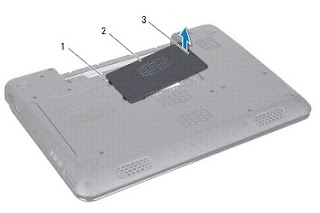
How to Removing the Base Cover Dell Inspiron N5010/M5010
1. Follow the instructions in Before You Begin.
2. Remove the battery (see Removing the Battery).
3. Loosen the captive screw that secures the base cover to the computer base.
4. Pry the base cover with your fingers and ensure that the base cover is released from the tabs on the computer base.
5. Lift the base cover off the computer base.

1. tabs
2. base cover
3. captive screw
How to Flashing the BIOS Dell Inspiron N5010/M5010
1. Turn on the computer.
2. Go to support.dell.com/support/downloads.
3. Locate the BIOS update file for your computer:
NOTE : The Service Tag for your computer is located on a label at the bottom of
the computer.
If you have your computers Service Tag:
a. Click Enter a Service Tag.
b. Enter your computers Service Tag in the Enter a service tag: field, click Go, and
proceed to step 4.
If you do not have your computers Service Tag:
a. Select the type of product in the Select Your Product Family list.
b. Select the product brand in the Select Your Product Line list.
c. Select the product model number in the Select Your Product Model list.
d. Click Confirm.
4. A list of results appear on the screen. Click BIOS.
5. Click Download Now to download the latest BIOS file.
The File Download window appears.
6. Click Save to save the file on your desktop. The file downloads to your desktop.
7. Click Close if the Download Complete window appears.
The file icon appears on your desktop and is titled the same as the downloaded BIOS
update file.
8. Double-click the file icon on the desktop and follow the instructions on the screen.
How to Removing the Camera Module Dell Inspiron N5010/M5010
1. Follow the instructions in Before You Begin.
2. Remove the battery (see Removing the Battery).
3. Remove the base cover (see Removing the Base Cover).
4. Remove memory module(s) (see Removing the Memory Module(s)).
5. Remove the optical drive (see Removing the Optical Drive).
6. Remove the keyboard (see Removing the Keyboard).
7. Remove the palm rest (see Removing the Palm Rest).
8. Remove the display assembly (see Removing the Display Assembly).
9. Remove the display bezel (see Removing the Display Bezel).
10. Remove the display panel (see Removing the Display Panel).
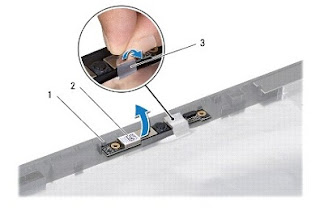
11. Peel off the metallic tape that secures the camera module to the display cover.
12. Remove the camera module from the latches that secure it.
13. Lift the camera module off the display cover.

2. camera module
3. metallic tape
How to Removing and Replace the Keyboard Dell Inspiron N5010/M5010
1. Follow the instructions in Before You Begin.
2. Remove the battery (see Removing the Battery).
3. Remove the base cover (see Removing the Base Cover).
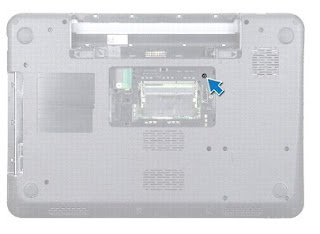
4. Remove the screw that secures the keyboard to the computer base.
NOTE: The screw that secures the keyboard to the computer base may not be
present in all computers.

5. Turn the computer over and open the display as far as possible.
CAUTION: The keycaps on the keyboard are fragile, easily dislodged, and
time-consuming to replace. Be careful when removing and handling the
keyboard.
6. Press the keyboard and slide it towards the bottom as far as possible.
7. Slide a plastic scribe between the keyboard and palm rest, and pry and lift the keyboard
to disengage it from the tabs on the palm rest

1. palm rest tabs
2. plastic scribe
3. keyboard
slots on the palm rest.
9. Without pulling hard on the keyboard, turn it over.
10. Lift the connector latch and pull the pull-tab to disconnect the keyboard cable from the
connector on the system board.
11. Lift the keyboard off the computer.

2. keyboard tabs
Blog Archive
-
▼
2017
(531)
-
▼
January
(108)
- DNS S5301Q Pc Suite and Usb Driver free Download
- Compaq Presario CQ57 422SS Drivers for Windows Vis...
- Dangdut Koplo Goyang Morena – Via Vallen – Sera Li...
- Creative Dap Md0007
- Dont Miss Dinos22 on The Next OC Show!
- Dangdut Koplo Populer dan Download Dangdut Koplo
- CORBY2 Theme Windows Theme
- Dell Mouse Driver
- Dell Inspiron 5439 Drivers For Windows 8 1 64bit
- Compaq Presario V6500 Drivers for Windows 7
- Dell Vostro 2520 Drivers for Windows 7 64bit
- Desain Undangan Type L3 13
- DC Unlocker v 1290 Netgear Aircard 779s News
- Dell Adamo 13 drivers for windows 10 64 bit
- DNS S4010 Pc Suite and Usb Driver free Download
- Dell Inspiron 1750 Drivers For Windows 7 32Bit
- Dell Precision Driver Re Update Nvidia
- Dell Webcam Driver Windows 7
- Decompile And Recompile 1
- Corby Society Expansion
- Download All the Version of Source Code For ASUS Z...
- CORBY2 Theme Stripey Version 1
- CORBY2 Theme The Sea
- DESAIGN UNDANGAN TYPE ML 858
- Creativ Sb 0410 Sb Live 24 Bit Soundcard
- Counter Strike 1 6
- CORBY2 Firmware Android Wannabe v1 4 8
- Dell Inspiron 5759 Drivers For Windows 7 64bit
- CORBY 2 Theme Blue VAIO
- Custom ROM Deodex
- CORBY2 Firmware Android Jelly Bean RC1
- Dell Inspiron 3558 Drivers For Windows 8 1 32 64bit
- Dell Inspiron 3437 Drivers For Windows 10 64bit
- Creating a Real Airport Card
- DELL Inspiron 5759 Support Drivers for Windows 7 6...
- DELL Inspiron 14 3452 Drivers Support for Windows ...
- CORBY2 Theme Stripey Version 3
- Downlaod diagram schematics nokia X2 01 RM709 no p...
- D Link DIR 130 Firmware
- Dell Inspiron 5451 Drivers For Windows 7 64bit
- Cyan Transparent Frame SecContacts
- Dell Inspiron 3451 Drivers For Windows 7 64bit
- Download All the Version of Source Code For ASUS Z...
- Dell Studio 1555 drivers for windows 7 64bit
- Contoh cerita Bencana Alam Banjir Bahasa Jawa
- Control your Google camera app with Android Wear
- DELL Alienware X51 R3 Free Drivers Download for Wi...
- DELL Inspiron 14 3452 Support Drivers for Windows ...
- Dfi Ps82 Bc Bl Ps83 Bc Bl Driver
- Contoh Surat Hening
- Dell Inspiron 14 N4050 Driver Windows 8 32 64bit
- Coolest way to Regain your Android Data Download R...
- CORBY2 Theme I Love You Baby
- Download Acer Aspire V3 111P All Drivers Utility U...
- Dangal 2016
- Descargar Commview Realtek 8187
- Compaq Presario CQ57 412TU Drivers for Windows XP
- DELL Inspiron 5759 Free Windows 10 64 bit Drivers ...
- Dell Inspiron 5448 Drivers For Windows 10 64bit
- Download Adcom Stock Rom for all Series
- Determinan Matriks 2x 2 dengan C
- DELL Latitude E5570 Windows 7 64bit Drivers
- Download All the Version of Firmware For ASUS ZenF...
- Cube U18GT C4 USB Driver For Windows 7Xp8 32Bit 64Bit
- Dell Inspiron 5458 Drivers For Windows 8 1 32 64bit
- DELL Inspiron 11 3135 Drivers Support for Windows ...
- Download Adobe Photoshop CS 3 Portable Full Version
- Dell Studio 1749 drivers for windows 7 64bit
- Dell Inspiron 3552 Drivers For Windows 7 64bit
- Doctor Oz How To Lose Belly Fat Hgh Reviews Sytrop...
- Download All Version of Source Code For ASUS ZenFo...
- Criminal Records Example The Importance Of Nanny B...
- DELL Inspiron 15 7548 Laptop Windows 8 1 Driver Do...
- Complete Oppo USB Drivers Collection Spflashfiles com
- Download All KingRoot Application
- Daftar Lengkap HP Android Dibawah 1 Juta Rupiah
- Dell Alienware 13 R2 drivers for windows 10 64 bit
- Domain US hanya 1 99 dari NameCheap
- CORBY2 Firmware Jelly Bean 2
- Desain Kamar Tidur Inspiratif
- Download Acer Aspire 4253 All Drivers For Windows ...
- Corel Draw Graphic Suite 11 12 X3 X4 X5 X6 X7 X8
- Diet Plans Indian Food Hoodia Gordonii P57
- DELL Venue 8 Pro 5855 Tablet Windows 8 1 64bit Dri...
- Dell Inspiron 5442 Drivers For Windows 10 64bit
- Dell XPS 15 9530 Drivers For Windows 8 1 32 Bit
- Dell™ Inspiron™ N5010 M5010 Service Manual...
- Dl10030b Driver For 7 Windows
- Compaq Presario CQ57 421EA Drivers for Windows Vis...
- Desain Rumah Minimalis Modern 2 Lantai
- DELL Inspiron 14 3421 Laptop Driver For Windows 7 ...
- DELL Inspiron 15 5545 Windows 10 64bit Drivers
- Dex GS501 Pc Suite and Usb Driver free Download
- CUSROM ZENUI Andromax I3
- Dell Alienware M18x R2 drivers for windows 10 64 bit
- DELL Inspiron 11 3000 2 in 1 Series 3157 Drivers U...
- Dave Loggins Please Come To Boston Download
- CORBY2 Theme Pink Green and Preppy
- Dapatkan Samsung Galaxy Tab 2 Tulis Harapanmu
- Dell Inspiron 3542 Drivers For Windows 7 32 64bit
-
▼
January
(108)