Showing posts with label a. Show all posts
Showing posts with label a. Show all posts
Thursday, May 18, 2017
Control a Phone with My Computer Android
Control a Phone with My Computer Android
Can you control your smartphone using only your computer? The answer is a resounding YES. The real question is: how much of your smartphone can you control? As I sat down to write this article, I had no clue what the answer to that question was, and to my surprise, the answer is quite a lot.
From texts and call logs to full blown mouse-and-keyboard input, we can actually do much more than you might expect.
MightyText
The first Android remote control app I used is MightyText and I must say… wow. This app can be summarized rather succinctly: send and read SMS messages through your Android phone by using a computer or tablet. Seems simple enough, right? Yet for something so easy, I’m blown away by how practical it is AND how polished the final product looks.
MightyText is a web app that stays in sync with your phone through a wireless connection. In order for it to work, you need to install the MightyText app on your phone and sign in using a Google account. As the app runs silently in your phone’s background, the web app (which you access using a simple URL) updates on the fly when you receive new texts.

With MightyText, you can browse your texts in two modes: Classic (selecting one conversation at a time) or Power (viewing all of your conversations at once in a grid). As you receive new texts, you’ll see popup notifications. Sending a message is easy as well; all you need to do is type away and press Send. You can even add attachments for those messages that transcend text.
The web app is beautiful and very responsive, so much so that I just feel cozy using it. The remote control portion of MightyText (the web app, basically) is available as a Chrome extension, Firefox addon, and an Android Tablet app. The regular web app works on IE, Safari, iPads, and Kindle Fires. Opera support is on its way.
LazyDroid
LazyDroid is named for those of you who are apparently so lazy that you can’t be bothered to go and physically grab your phone. I’m okay with that though; it describes me rather well. But on a more serious note, LazyDroid is really cool. All you have to do is install the app onto your Android phone and run it in the background while your phone has Internet access.
The app will tell you the “server IP” of LazyDroid on your phone, but don’t worry. It’s not as scary as it sounds. Just type that IP and port (it should be in a form similar toxxx.xxx.xxx.xxx:xxxxx) into your browser and you will be presented with something that looks like a full-blown desktop. This is where all of the magic happens.

From this desktop, you can control many different aspects of your phone: SMS, contacts, call logs, camera, sensors, file manager, or even direct remote control of the device. Just be sure to note that remote control requires your Android to be rooted. By default, the web app connects to your phone through a wireless connect, but LazyDroid has a USB client that you can use if you want a direct connection (less lag).
The LazyDroid app isn’t exactly free. You can use it without limit for 24 hours, but once the trial is over you’re stuck between using the limited version OR upgrading to premium which costs $4.00 USD.
Android Screencast
Android Screencast is a small hobby project that lets you remote control your Android phone through the Android SDK. We have an article that will help you set up the Android SDK; just scroll down to the section called Setting Up Your PC… and you’ll be good to go. The Android SDK is what grants your PC control of your Android device when the USB is plugged in.

With Android Screencast, you can: control your device completely using mouse and keyboard (rooted devices only); record the screen to video while you use your phone; browse your phone’s file system effortlessly. What are the downsides? Well, since it’s a small hobby side project, it isn’t very optimized or polished and you’ll experience some hiccups.
All in all, it shows some promise but needs a bit of work done before I’d consider switching to it. Just know that it’s out there and it may turn into a real project sooner or later. Requires Java Runtime Environment 5 or higher to operate correctly.
Conclusion
So can you control your phone from your computer? Yes, you can. The technology may still be primitive with a number of flaws and missing features, but give it a year or two. Current developers will break new ground and other developers will start their own competing apps, all resulting in better remote control for our phones. Whether remote phone control is necessaryis a topic for another time.
Know of any other remote control apps for Android? Please share them in the comments. This is an area that I wasn’t aware existed until a few days ago, so researching all of these possibilities has been a blast. I’d love to hear about other alternatives.
Go to link Download

Wednesday, May 17, 2017
Create a Basic Graphic Design using MS Word
Create a Basic Graphic Design using MS Word

editing or not as long as you know how to use computer.
Things Needed:
- Microsoft Word ( Any version, I will be using 2007 on this tutorial )
- Gather text at www.cooltext.com, a free website which offers generated logo & designs.
1.) Launch Microsoft Word.
2.) Go to www.cooltext.com and choose a logo style which satisfies you. Edit the logo you chose and if possible, try to match the colors on the designs youll make.

- Enter your Logo Text ( In my case, I put CorbySociety )
- Choose a Font. Cooltext offers lots of font including 3D font and Graffiti.
- Adjust your logo size.
- Configure the color you want.
3.) After configuring your logo, Scroll down and click "Create logo".
4.) Right click the logo and then click "Copy".
NOTE: Do not download, just copy and paste it in Microsoft Word.

- The image you have copied has a transparent background, thus giving the design a professional looks.
- Paste it in Microsoft Word.
5.) You can make lots of logo designs, so do not hesitate to make more for better design.

- In my case, I made 4 designs with different color.
6.) Right click each logo, click "Text wrapping" and then "In front of text" or "Behind text".

- Make sure to follow this step so that you can move your logo along in each side.
7.) Now its time for you to create a basic graphic design. There are lots of ways, it depends on you on how you should do it. You can rotate the logo, re-size it, combine it with others or overlay it on a background image.

Or you can make a Shadow Type logo.

Or you can overlay it on an image.

- When you add image or logo, Do not forget to wrap it on text. Right click each logo, click "Text wrapping" and then "In front of text" or "Behind text".
Saving your Design:
 |
| Photo Courtesy: Howtodo |
After finalizing your design, its time to save it. Go to Microsoft Word and click "Print Screen" on your keyboard. Now launch "Paint" and paste it by pressing "Ctrl+V". If you dont have knowledge about pasting, then try to read this article by Howtodo.

- Crop your design on its desired size. If you dont know how to crap, then try to read this article by wikihow.
- Now save your design and your done.
I hope this small tutorial can help you. If you have questions/clarifications, please leave a comment.
Go to link Download
Sunday, March 5, 2017
Dealing with communication overload in a corporate setting
Dealing with communication overload in a corporate setting

I absolutely fucking LOVE this movie. But unfortunately for me, twenty years after the movies release, (just 6 years shy of the date in the movie) we are living in the not-quite-so-dystopian-yet-still-kinda-shitty future predicted in the film. And while nobody is running around with cybernetic enhancements or digital memory augmentation brain implants, they did get one key thing right in this movie: information overload will be the death of you.
In the movie, that statement is taken absolutely literally and constant bombardment of external stimulus input eventually causes a neurological disorder called "Nerve Attenuation Syndrome" or simply "NAS" (which, in my line of work means "Network Attached Storage", ironically is a common remedy to information overload on hard drives. hmmm...) which causes the victim to suffer potentially life threatening seizures, a phenomenon referred to in the movie as "The Black Shakes".
A few years ago during the death throes of the MySpace empire, when Facebook was rapidly taking a commanding lead in the Social Networking race, I at one point had a Yahoo account, an AIM account, a Gmail account, a MySpace account, a Facebook account, a Twitter account, and the list goes on and on. I started to feel so overwhelmed by the incessant barrage of emails I was getting, both from legitimate sources and in the form of spam, as my "free" email accounts had been whored out around the Internet to every advertising firm in existence. I tried many things at first, creating folders and rules to manage my emails, and then subfolders and subrules to try and create some order from the chaos, but it just became even more complicated and difficult. Eventually, I found myself at my wits end with the situation, when I came across a solution: a concept I encountered a few years ago called "Inbox Zero", which I stumbled across on YouTube. https://youtu.be/z9UjeTMb3Yk
A brief rundown of the Inbox Zero concept; Inbox Zero is an extremely aggressive approach to managing your inbox, where the goal is to maintain zero -or as close to it as possible- emails in your inbox at all times. The process of sifting through the years worth of accumulated debris is a bit time consuming, especially if you are a serial social networking user. You have to take the approach you would take to cleaning out a loved ones home after theyve passed away. You need to look at each piece of mail and be brutally honest as you ask yourself: can I live without this? Youll find that nearly 100% of the time, the answer is unequivocally yes. If you have information you need to hold on to for historical purposes, like tax information for example, that is not something that belongs in your inbox, nor does it belong in the cloud. You should have a hard copy in a Manilla file folder locked up securely somewhere at your residence for safe keeping, or at the very least in an encrypted file on your computer. Sensitive material just doesnt belong in the cloud, and it certainly doesnt belong in your inbox. Dont believe me? Just ask every unfortunate girl that had pictures of their snatch plastered all over the Internet after the massive iCloud breach earlier this year (the "Fappening"). Basically, if you dont want anyone else to get their hands on it, dont leave it online! Its that simple.
If someone sent you some pictures you want to hang on to, download them! Import them into iPhoto. Upload them to your Google Drive. They dont belong in your inbox. See, people have this nasty habit of doing really stupid shit like emailing important documents to themselves, and then leaving them there, eating up space in their inbox indefinitely. Thats what cloud storage or a thumb drive is for. In this day and age when everyone carries around a cell phone with storage capacity that dwarfs that of even some computers or recent vintage, theres no excuse for abusing your inbox by cramming it full of attachments that should be stored in another fashion. I always say use the right tool for the job; although email protocols have been extended over the years to support many types of media, more and more businesses (my employer included) have very aggressive security policies in place that arbitrarily block attachments that are anything but plain text documents. If you have projects you need to collaborate on, your company should have some locally attached network storage where you and your team keep such documents. If you need to access that storage outside of your work network, thats what VPN is for. Using your email as cloud storage or a file server is a bit like trying to drive in nails with a wrench. Sure it can be accomplished, but again, use the right tool for the job.
So after months of battling with my email, I have found my salvation. Ive started a similar campaign to Inbox Zero that I call "antisocial networking". Not only have I swung the axe wide on what is already in my inbox, but I started to kill the problem at the source. I started pairing down, closing accounts that I dont use. I used websites like justdelete.me and started a seek and destroy campaign to reduce my footprint on the Internet, eradicating dozens of old accounts for things like music streaming services I dont use, forums Im not active on, image/file hosting websites, and destroying virtually all social networking accounts, including what I consider to be the holy grail of unplugging- actually deleting my Facebook account.
I apologize for getting sidetracked here, but I feel like this needs to be said. For a long time, the conventional wisdom was that its simply not possible to actually delete a Facebook account, rather that you can only deactivate it. But then in my search to purge my existence from the Internet I came across Facbeooks best kept secret. You CAN delete your account. There just is no link to the page to do it anywhere on Facebook, nor can you find the page by doing any amount of Google searching. The only way to access the page is type the URL in directly, and its so brain dead simple I cant believe that this isnt common knowledge, but at any rate, here it is
https://www.facebook.com/help/delete_account
Now where was I... So there I was, happily reading and subsequently deleting maybe 5-10 emails a day, now that I was no longer a slave to social networking. And that was all well and good, but then about a half a year ago I got a huge promotion to a new team within my company, and unfortunately for me, everyone --EVERYONE-- on this team lives and dies by their email. Im constantly finding myself bombarded with errant emails. And theres always that one asshole who has to hit reply all to every fucking email. Every. Single. One. Im constantly getting alerts on my phone with one sentence messages between two people carrying on a conversation that has absolutely nothing to do with me. I apologize now for going on a rant here, but two things must be said. First and foremost, before you click that send button, you really should ask yourself
"Is this something that would be better suited for Lync/Skype?" Simple criteria for this: is this an extremely time sensitive matter? Is this something that can be asked in a single sentence?
and secondly, you need to consider what "email" actually is. It is the digital replacement of actual mail. As in letters. Professional correspondence. You use it for communication when a paper trail needs to be established. Usually of an official or semi-official nature. Things like punctuation, spelling, grammar, and professional etiquette should be taking into consideration before drafting up an email. There is actually a proper format for email, and I find it appalling how few people in the very tech savvy and professional environment in which I work do not seem to get that.
Essentially, if its something that you would otherwise type up, proof read, print, neatly fold and seal in an envelope, apply postage and drop off at the post office, consider yourself blessed with the ability to cut out a huge amount of administration in the process, but dont forget to mind your Ps and Qs. And for Gods sake, dont include any emoji in your message. Where is your sense of professionalism? If the word vomit your about to spew into a few dozen peoples inboxes doesnt meet all of the above criteria, then please have a little decency and just send someone an IM.
In a corporate setting where the standard practice is to just indiscriminately rape the inboxes of every member of your team every time you have a half formed thought enter your head, what can you really do about it? Honestly, not a whole hell of a lot. Theres virtually nothing you can do to change the culture. Especially when you have members on your team that seem to hold a polar opposite stance, openly flaunting basic email etiquette (like forgetting to turn off caps lock in between doing data entry into an excel spreadsheet and firing off rogue emails. I dont enjoy being yelled at, do you?) and publicly praising other members of the team for "how well they communicate" as my goddamn inbox gets serially spammed with another 10-15 pointless emails over something that could have and should have been a private conversation.
The best Ive been able to come up with is to create an "Important" folder in my inbox, and anything that falls under that category gets triaged there as soon as it hits my inbox. Everything else gets round filed the second I see it. I try to set aside 10-15 min per day to respond to the "important" stuff" each day, and then I archive my inbox once a week. Its not perfect, but it goes a long way towards keeping my head out of my inbox and in the task at hand.
At work I dont have the luxury of "inbox zero". And while Im not going to develop a case of "the black shakes" from 76 emails Ive received already this morning, it is enough to give me a nervous tick. Im willing to bet money that if my company runs like this, there are hundreds of thousands of other companies out there that suffer from the same kind of problems, and Id be willing to bet that consulting firms out there will stand to make a lot of money in the near future as the current system of information management (or lack thereof) slowly degrades into inevitable entropy and chaos.
Go to link Download
Saturday, March 4, 2017
Create an array of 10 000 random interger number elements array A Tạo Radom Array Integer trong C
Create an array of 10 000 random interger number elements array A Tạo Radom Array Integer trong C
Create an array of 10,000 random interger number elements (array A)
=========================================================================
27212 23947 7446 19659 1052 5771 21256 11110 32057 10666
26250 12670 13145 3925 31148 5874 25774 7043 9429 5536
6763 20016 21858 23934 7301 2061 32655 3815 21174 30582
10139 12082 14024 20900 1575 19337 15376 11300 19424 15864
20537 2695 18525 18629 22851 29788 30794 31744 21706 10075
…
T?o Radom v?i m?ng Integer trong C
C 2016
#include<stdio.h>
#include<stdlib.h>
#include<time.h>

int main()
{
 int i;
 int arraysize = 100; //cho chay 100 vong test!
 int numbers[arraysize]; //Khai bao mang kich thuoc 100
 srand(time(NULL));
 //Gan moi so Random vao mang thu i
 for(i=0; i<arraysize ; i++){
 numbers[i] = rand()%10000;
 }
 //In ra man hinh mang vua Random
 for (i=0;i< arraysize;i++)
 {
 printf("%d ",numbers[i]);
 }
 return 0;
}

Go to link Download
Friday, March 3, 2017

Friday, February 10, 2017
Create A Custom Ubuntu Or Linux Mint ISO With PinguyBuilder
Create A Custom Ubuntu Or Linux Mint ISO With PinguyBuilder
PinguyBuilder is a script which allows creating a customized Live CD/Live USB (remaster) of Ubuntu or Linux Mint, that can be used either as a distributable ISO or as a backup.

The script is a fork of remastersys, created by the Pinguy OS developer and its actually the tool used to build Pinguy OS.
PinguyBuilder allows creating a complete system backup (including user data) or a distributable ISO or filesystem and from its UI, it allows selecting a boot menu picture, Plymouth theme as well as the user whose settings will be used as default.
Other features include: EFI support (including EFI partition on ISO), offline install of grub-efi-amd64-signed (so it works with Linux Mint), MDM and GDM support and more.
The tool comes with a GTK user interface but it can also be used from the command line - simply run "sudo PinguyBuilder" and follow the instructions.
Its important to mention that you cant build an ISO larger than 4GB and youll need GDebi to install PinguyBuilder or else the app may not start, according to its release notes (GDebi is no longer required).
Download PinguyBuilder
Download PinguyBuilder
Version 3.x is for Ubuntu 14.04 and version 4.x is for Ubuntu 15.04+. For Ubuntu 15.10, youll need to manually download and install xresprobe (download: 32bit | 64bit) because this package is not available in the official repositories any more.
Important note: remove remastersys before installing PinguyBuilder to avoid any incompatibility issues.
Important note: remove remastersys before installing PinguyBuilder to avoid any incompatibility issues.
Make sure you read the FAQ on its download page before installing PinguyBuilder!
Thanks to Antoni for the tip!

Go to link Download
Wednesday, January 18, 2017
Creating a Real Airport Card
Creating a Real Airport Card
I moved my Hackintosh desktop to the loft upstairs during the last holiday season and as a result had to say goodbye to my gigabit ethernet connection. Running CAT6 cable all the way upstairs just wasnt feasible, so the only option I was left with was Wifi. While I do miss the speed of the wired connection, I can certainly appreciate the convenience of the connection without the hassle of wires. And having my desk moved out of my living room to the loft where I can get a lot more peace and quiet has been a huge benefit.
When I first moved my computer upstairs, I had assumed that I was going to be able to use my Netgear WG111v3 dongle that Ive had laying around for years. As I recall from past experience, it did in fact work on OSX, albeit using a third party RealTek WLAN manager application. Of course, the last time Id tried to use the Netgear USB stick was way back when I was still running Snow Leopard. As soon as I got my computer upstairs, I was disappointed to learn that Snow Leopard was the last version of OSX to support this card! What do you know, the RealTek WLAN Manager was a piece of abandonware that was created during the Tiger era. The only reason it still worked on Snow Leopard was because of Rosetta. Now, since there have been TWO major OSX versions and no less than 7 point releases since Rosetta was removed from OSX, I found myself with a bit of a dilemma. I needed a compatible WiFi card, and fast.
In the mean time, I was forced to turn to Windows for my day to day computing needs, because -- lets face it -- as awesome as OSX is, its basically worthless without Internet.
So I did a little digging and found out that there are only a select few wifi cards that work with OSX, just a handful of Atheros and Broadcom chipsets. As luck would have it, I happened to have two compatible wifi cards in my possession; an Atheros AR5007 which works using a modified IO80211Family.kext and a Broadcom BCM4311 which happened to work out of the box with OSX. So I was already halfway there with a compatible wifi card in hand. Now I needed to address the issue of how to plug a half-mini PCIe WLAN card into my motherboard. I happened to have an open PCIe X1 port on my motherboard, so I bought a $10 mini-PCIe to PCIe adapter on Amazon (one with antennas built into it, custom designed for my purposes) and a few days later it showed up on my doorstep.
Installation couldnt have been simpler, I simply plugged the wifi card into the adapter, screwed it down to the adapter, plugged in the antenna wires and installed it in my motherboard. I crossed my fingers as I booted up the old Hackintosh, and leapt for joy when I was greeted by my desktop with the Airport icon in the system tray.
I continued to use my "Airport" card for a few weeks, but I started noticing that my connection was not as stable as I would have liked it to be. Occasionally I would just lose the ability to get online, but it would still show that it was connected to my LAN. And I started noticing that file transfer speeds were pretty bad, especially when I would be transferring large files. So I did a little digging and discovered that these types of problems were fairly common for Wifi cards other than real Airport cards, and there were two solutions:
1) buy a real Airport card
2) rebrand my Broadcom card
I opted to go with option 2. Rebranding my Broadcom card is a fairly technical process that involved extracting the EPROM information from the card, modifying the data, creating a new EPROM binary file and then flashing the EPROM file to the card. It sounded like a challenge I could handle, and worst case scenario, Id just end up going with option 1 anyway and forking over $50 for a $10 wifi card.
The basic process of rebranding a Broadcom card is covered fairly well here on Prasys blog, but unfortunately the guide was written back in 2009, as were the tools required to do this process. Also, since this guide is pretty old, the like to the git repo is non functional. I found a working repo here:
git clone git://git.bues.ch/b43-tools.git
Believe me! I attempted to follow the instructions on Ubuntu 12.10 which I have installed on a separate hard drive on my Hackintosh, but to no avail. I would get to the part of the process where you actually extract the current EPROM data and nothing would happen. So I started digging through my old live CDs that I had laying around, including Ubuntu 12.04, 11.04, 10.04, and 8.04, and not a single one of them worked! They would all fail when I would attempt to extract the EPROM. But then I went back and read Prasys blog a bit more carefully and saw that he very clearly said that either Ubuntu 9.04 or 9.10 would work.
So this is where the real fun began. I had to go grab a copy of Ubuntu 9.10 from here and create a bootable USB stick. Now, Ubuntu 9.10 has long since been EOL and dropped from the regular repos, so all that handy software that Prasys says to install is just going to fail with a bunch of 404 errors. The solution to that is a secret that Ubuntu likes to keep pretty close to the chest. I mean, Ive been using Ubuntu since 2007 and just recently learned about this. In the case that you need to use a deprecated version of Ubuntu that is already past EOL, the repos do not simply disappear. Instead they get moved, just no longer updated. In order to be able to install software again on an EOL version of Ubuntu like Karmic (9.10) you need to erase the existing /etc/apt/sources.list and replace it with the following
replacing CODENAME with whatever version of Ubuntu youre using. Then, just save your /etc/apt/sources.list and run sudo apt-get update, et voila! Youll be back in business.deb http://old-releases.ubuntu.com/ubuntu/ CODENAME main restricted universe multiversedeb http://old-releases.ubuntu.com/ubuntu/ CODENAME-updates main restricted universe multiversedeb http://old-releases.ubuntu.com/ubuntu/ CODENAME-security main restricted universe multiversedeb http://old-releases.ubuntu.com/ubuntu/ CODENAME-backports main restricted universe multiverse
Once I had working software repos on my Ubuntu 9.10 thumb drive, the process was pretty simple. It assumes that you have some method of getting online other than the Broadcom wifi card youre about to modify, so that Netgear dongle I had came in handy.
sudo apt-get install build-essential
sudo apt-get install curl
sudo apt-get install git-core
sudo apt-get install b43-fwcutter
sudo modprobe b43
cd
git clone git://git.bues.ch/b43-tools.git
cd b43-tools/ssb-sprom
make
sudo cp -vR ssb-sprom /usr/sbin/
SSB_SPROM=$(find /sys/devices -name ssb_sprom)
echo $SSB_SPROM
At this point the system returned a string that looked something like "/sys/device/pci/0000:00/ssb_sprom" so I knew that it was going to be able to extract the EPROM data finally.
cd
sudo cat $SSB_SPROM > ssb_sprom_copy
sudo ssb-sprom -i ssb_sprom_copy -P
ssb-sprom -i ssb_sprom_copy –-subv 0×106b –-subp 0×004e -o new_ssb_sprom_copy
and then I flashed the new_ssb_sprom_copy file I created over the old EPROM on the card. Then I crossed my fingers and rebooted back into Mac OSX. I checked the system profiler and it did indeed now report the card as a genuine Airport card and not a third party card. All of my Airport problems have gone away.

Go to link Download
Wednesday, November 16, 2016
DO YOU KNOW THAT YOUR BROWSER HAS A CALCULATOR
DO YOU KNOW THAT YOUR BROWSER HAS A CALCULATOR

Hi Friends !!..Do you know that your Web Browser contains a default calculator ?...Do you want to use that?...Then this post is for you.
Now Ill show how to use your web browser as a calculator.You have to open your Browser console for to use it as a calculator .
1. Google Chrome


3. Opera

Here im posting a little demo just to show you how it actually works
 |
Demo |
Enjoy this funny calculator...& for more tricks keep visiting this blog...:)
REGARDS
Shankha Jana
Go to link Download
Sunday, October 30, 2016

Tuesday, October 25, 2016
Download A Tribute To KLa Project
Download A Tribute To KLa Project
 ketoprakdjawir. - A Tribute To KLa Project adalah album musik kompilasi dari grup band KLa Project yang dirilis pada tahun 2011. Album ini berisi 10 lagu lama KLa Project namun diaransemen oleh 10 artis setiap lagunya. Namun cara pemasarannya lebih berbeda dari pada album KLa Project sebelumnya, karena album ini hanya dipasarkan di supermarket Indomaret.
Daftar Lagu:
- Tentang Kita (Ran)
- Lantai Dansa (The Upstairs)
- Yogyakarta (Ungu)
- Semoga (Vidi Aldiano)
- Terpuruk Ku Disini (Ahmad Dhani)
- Bahagia Tanpamu (Violet)
- Meski Tlah Jauh (Pongki Barata)
- Sudi Turun Ke Bumi (Babas)
- Prasangka (Maliq & DEssentials)
- Menjemput Impian (Kerispatih)

Go to link Download
Saturday, October 22, 2016
Create A Bootable USB Stick On Ubuntu With GNOME Disks Quick Tip
Create A Bootable USB Stick On Ubuntu With GNOME Disks Quick Tip
[Quick tip] Ubuntu Startup Disk Creator has been known to be buggy at times, so users have been looking for alternatives. Well, some might not be aware of this, but theres another GUI tool already installed by default in Ubuntu (w/ Unity) and Ubuntu GNOME, as well as other GNOME-based Linux distributions, which allows creating a bootable USB stick: GNOME Disks.
GNOME Disks is reliable, very easy to use and should already be installed if you use Ubuntu with Unity or GNOME.
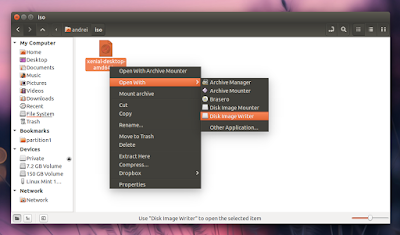
To create a live USB using GNOME Disks, open Nautilus, right click the Ubuntu (Fedora, etc.) ISO and select Open With > Disk Image Writer:
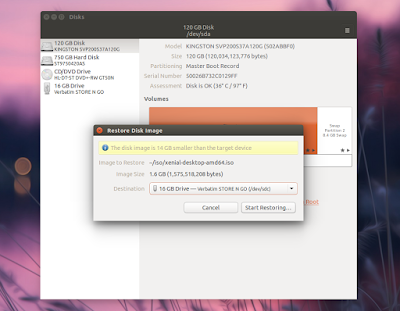
Next, simply select your USB drive as the Destination (and double check to make sure the drive you select under "Destination" is correct because the data on it will be destroyed!) and click "Start restoring...":
Note that this method doesnt support data persistence, so when starting up from this USB, the documents and settings will be discarded on shutdown.
And speaking of GNOME Disks and USB drives, you can also use this tool to format USB sticks, edit partition, create a disk image, change filesystem label and more.
In case youve removed GNOME Disks Utility or your Linux distribution doesnt provide it by default, install the "gnome-disk-utility" package. In Debian / Ubuntu (and derivatives), install it using the following command:
sudo apt-get install gnome-disk-utilityGo to link Download
Subscribe to:
Posts (Atom)