Showing posts with label create. Show all posts
Showing posts with label create. Show all posts
Wednesday, May 17, 2017
Create a Basic Graphic Design using MS Word
Create a Basic Graphic Design using MS Word

editing or not as long as you know how to use computer.
Things Needed:
- Microsoft Word ( Any version, I will be using 2007 on this tutorial )
- Gather text at www.cooltext.com, a free website which offers generated logo & designs.
1.) Launch Microsoft Word.
2.) Go to www.cooltext.com and choose a logo style which satisfies you. Edit the logo you chose and if possible, try to match the colors on the designs youll make.

- Enter your Logo Text ( In my case, I put CorbySociety )
- Choose a Font. Cooltext offers lots of font including 3D font and Graffiti.
- Adjust your logo size.
- Configure the color you want.
3.) After configuring your logo, Scroll down and click "Create logo".
4.) Right click the logo and then click "Copy".
NOTE: Do not download, just copy and paste it in Microsoft Word.

- The image you have copied has a transparent background, thus giving the design a professional looks.
- Paste it in Microsoft Word.
5.) You can make lots of logo designs, so do not hesitate to make more for better design.

- In my case, I made 4 designs with different color.
6.) Right click each logo, click "Text wrapping" and then "In front of text" or "Behind text".

- Make sure to follow this step so that you can move your logo along in each side.
7.) Now its time for you to create a basic graphic design. There are lots of ways, it depends on you on how you should do it. You can rotate the logo, re-size it, combine it with others or overlay it on a background image.

Or you can make a Shadow Type logo.

Or you can overlay it on an image.

- When you add image or logo, Do not forget to wrap it on text. Right click each logo, click "Text wrapping" and then "In front of text" or "Behind text".
Saving your Design:
 |
| Photo Courtesy: Howtodo |
After finalizing your design, its time to save it. Go to Microsoft Word and click "Print Screen" on your keyboard. Now launch "Paint" and paste it by pressing "Ctrl+V". If you dont have knowledge about pasting, then try to read this article by Howtodo.

- Crop your design on its desired size. If you dont know how to crap, then try to read this article by wikihow.
- Now save your design and your done.
I hope this small tutorial can help you. If you have questions/clarifications, please leave a comment.
Go to link Download

Thursday, March 9, 2017
Create Your Own ROM Guide NEW
Create Your Own ROM Guide NEW
Who is this tutorial for?
Tools Required : (Update them manually and report me dead links please)
1- Java JDK FROM HERE OR JAVA.SUN.COM - FOR INSTALLING CYWIGN.
2- Cywign Direct Download- Linux Terminal For Windows
3- Android Kitchen (ROM Development Tool)- For Cooking custom ROM and many more things, Please update this Kitchen to latest version when available.
4- Demo META-INF Folder Download- For Making Flashable zip files and comparing updater script.
5- Custom Booting.zip - for custom boot animation
6- notepad for editing files like build.prop, updaterscript
7- MOST IMPORTANT TOOL YOUR BRAIN... AND ALSO LOTS OF TIME... [DOWNLOAD LINK NOT AVAILABLE. ]
Step one: Installing the JAVA JDK, Cygwin and Setting up the Kitchen.
*Before you do anything install the java jdk*
INSTRUCTIONS
Quote:
- Absolute Beginners.
- People with little or no programming skills.
- people who really want to learn how to make custom roms
- people who want to learn android and dont know where to start.
1- Java JDK FROM HERE OR JAVA.SUN.COM - FOR INSTALLING CYWIGN.
2- Cywign Direct Download- Linux Terminal For Windows
3- Android Kitchen (ROM Development Tool)- For Cooking custom ROM and many more things, Please update this Kitchen to latest version when available.
4- Demo META-INF Folder Download- For Making Flashable zip files and comparing updater script.
5- Custom Booting.zip - for custom boot animation
6- notepad for editing files like build.prop, updaterscript
7- MOST IMPORTANT TOOL YOUR BRAIN... AND ALSO LOTS OF TIME... [DOWNLOAD LINK NOT AVAILABLE. ]
Step one: Installing the JAVA JDK, Cygwin and Setting up the Kitchen.
*Before you do anything install the java jdk*
Quote:
Try this Dsixda Kitchen Install Picture Tutor(recommended)
OR
watch this video tutorial by gitagaire for how to setup cygwin and kitchen(recommended)
OR
watch this video tutorial by gitagaire for how to setup cygwin and kitchen(recommended)
INSTRUCTIONS
- Download and extract the cygwin_packages.zip
- Run the set up(make sure there is no previous cygwin installation)Quote:NOTE: INSTALL CYGWIN IN ROOT DISK LIKE C:
- Follow the kitchen read me txt!!!
- local package directory *must* be the path to the cygwin_packages folder that you just extracted
- when it shows all the package names, go to the top and select "all default" until it changes to "all install" (you must click on the arrow
- Download the kitchen from above. Then, extract the kitchens .zip file to a folder under your home account. Rename the dsixda-android-kitchen-*** folder to just "kitchen". In Cygwin, this folder would depend on what was set for your Cygwin install directory, e.g. C:cygwinhomeJohnkitchen
NOTE!! If your user folder contains spaces (e.g. C:cygwinhomeJohn Smithkitchen), then the kitchen will not function properly. Instead, copy it under C:cygwinhomekitchen. - Now your ready to run the kitchen type:
Step Two: Setting up a working folder
THERE ARE TOW METHODS FOR THIS.
1. WHEN YOU HAVE BASE ROM AVAILABLE.
2. WHEN YOU DONT HAVE BASE ROM.
FIRST METHOD -
Read more »
THERE ARE TOW METHODS FOR THIS.
1. WHEN YOU HAVE BASE ROM AVAILABLE.
2. WHEN YOU DONT HAVE BASE ROM.
FIRST METHOD -
- First our folder structure should look like this:Code:
- cygwin folder/home/your user name/kitchen
- Now we need a rom to work on, for GALAXY ACE PLUS[s7500] users i will recommend this rom by blackburner but you can use any rom.
Just Place the original rom zip in the original_update folder inside the kitchen. - run the cygwin.exe again type:Code:
cd kitchen(enter)
./menu(enter) - now enter option 1, enter again. You should see your rom listed, choose and enter
you will be asked about changing the working folders name, at this point it makes no difference so just continue. - congratulations you have a working folder!!!
SECOND METHOD - this method is by neroyoung
FIRST MAKE A WORKING FOLDER IN CYGWIN FOLDER
NOTE: FOR THIS MEETHOD WE NEED 3 FILES AND FOLDERS TO BE PLACED IN WORKING FOLDER.
1. META-INF FOLDER - GET THIS FROM DOWNLOAD FILES LIST IN FIRST POST
2. SYSTEM FOLDER - TUTORIAL BELOW
3. BOOT.IMG - TUTORIAL BELOW
2. getting system folder
(NOTE - YOU MUST BE ROOTED FOR THIS MEDHOD)
3. getting boot.img
Here we have 2 options
1. stock boot.img from stock rom - simple kernel which we get in brand new mobile.
2. custom boot.img from custom kernel - kernel which are modified for overclock or other features
FIRST MAKE A WORKING FOLDER IN CYGWIN FOLDER
Quote:
IT SHOULD LOOK LIKE THIS
cygwin folder/home/your user name/kitchen/WORKING_(your rom name)
cygwin folder/home/your user name/kitchen/WORKING_(your rom name)
NOTE: FOR THIS MEETHOD WE NEED 3 FILES AND FOLDERS TO BE PLACED IN WORKING FOLDER.
1. META-INF FOLDER - GET THIS FROM DOWNLOAD FILES LIST IN FIRST POST
2. SYSTEM FOLDER - TUTORIAL BELOW
3. BOOT.IMG - TUTORIAL BELOW
2. getting system folder
(NOTE - YOU MUST BE ROOTED FOR THIS MEDHOD)
- This is universal method and can be done easily using terminal emulator.
For this simply download Terminal Emulator from Android Market.
we need freshly flashed device here. OTHERWISE YOU WILL HAVE LOT OF JUNK FILES. - Open it and type:This will copy all your /system folder to your SDcard with name System.tarQuote:su
tar -c system/* >> sdcard/system.tar
This will take some time to finish so be patient. - After its done you should have a tar file in your /sdcard named system.tar
You can extract it using Winrar or 7zip software. But yes this will have huge size , as it has other useless folders so you will have to delete them. After extracting this system.tar file you will get following folders (Similar one)Quote:- /etc
- /fonts
- /framework
- /lib
- /lost-found
- /media
- /sd
- /semc
- /usr
- /xbin
- build.prop
- And some other files and folders like ""autorooted,kernel files" etc
Now simply delete the folders marked in red color and its done.Dont worry if you dont have folders with red colors above,we dont need them. - And the final files that we will have in our system folders will beQuote:
- /app
- /bin
- /etc
- /fonts
- /framework
- /lib
- /media
- /semc
- /usr
- /xbin
- build.prop
If it dont have semc folder no need to worry.
NOTE: YOU CAN ALSO GET THIS SYSTEM FOLDER BY USING ANY ROOT BROWSER. JUST FIND THIS FOLDER AND COPY/EXTRACT TO SDCARD - NOW COPY THIS system FOLDER TO WORKING FOLDER
3. getting boot.img
Here we have 2 options
1. stock boot.img from stock rom - simple kernel which we get in brand new mobile.
2. custom boot.img from custom kernel - kernel which are modified for overclock or other features
Quote:
1. getting stock boot.img from stock rom.
extract your stock rom with winrar or 7zip. you will see boot.img there. copy it to working folder
2. getting custom boot.img from custom kernel.
extract your stock rom with winrar or 7zip. you will see boot.img there. copy it to working folder
2. getting custom boot.img from custom kernel.
- download any custom kernel which is only for your device. [galaxy ace plus [s7500] users get from here or here]
- extract it with winrar or 7zip and copy boot.img to working folder
Step Three :change/modify/update rom
YOU CAN MODIFY YOUR ROM IN TWO STEPS:
2. MODIFYING MANUALLY.
FOR ALL ANDROID PHONES (ESPECIALLY FOR GINGERBREAD ROMS) USE THIS GUIDE FOR COOL MODS. like center clock,CRT animation, ics and jelly bean style mods etc... ANOTHER GUIDE BY ME
YOU CAN MODIFY YOUR ROM IN TWO STEPS:
- MODIFY USING ANDROID KITCHEN - for basic modification.
- MODIFY MANUALLY. - for advanced modification.
Quote:
watch this amazing tutorial by neroyoung on how to editing rom with kitchen
NOTE: DONT FORGET TO DEODEX YOUR ROM
NOTE: DONT FORGET TO DEODEX YOUR ROM
HERE
FOR ALL ANDROID PHONES (ESPECIALLY FOR GINGERBREAD ROMS) USE THIS GUIDE FOR COOL MODS. like center clock,CRT animation, ics and jelly bean style mods etc... ANOTHER GUIDE BY ME
- Adding/removing applications
1. Go to the working folder where you extracted your rom, inside you will find:OR
2. Then go to "system/app" inside this folder you will find all the rom applications(apks) you may also find some in the data folder if your rom has this folder.
3. Copy, replace, and change any app(apk) be carefull if you dont know what the apk is do not delete!!
LIST OF APPS YOU CAN DELETE - HERE OR HERE
If you can not find some apps in this guide then try opening all those app in your phone and see app name and icon or move those apps from system/app to sdcard and see what is not working... - Adding new boot animation
android kitchen doesnt works for this in Samsung phones. So we need a different method.
1) Download and extract the bootanimation and samsungani file from Custom Booting.zip attached in first post.
2) Put them in the /system/bin folder and replace the existing files there
3) Now download any boot animation, and rename the bootanimation to “sanim.zip”.
4) Now, navigate to /system/media and replace the “ODEanim” with “sanim.zip”
You are done with the bootanimation change - customizing the theme
1. replace stock launcher with launchers like nova launcher
2. theming using uot kitchen (fonts, status bar, batery and other icons etcQuote:
watch this amazing toutorial by jdlogan151 - Edit the gps script for your country/location
1. In the workingfolder/system/etc/ you will find a file named gps.conf, you can
edit this file with notepad++ or even word.
2. using the right gps script in this file can speed up gps lock, you can
find some from angeldeath, download extract and replace the gps.conf. - Adding ringtones :
- Take your ringtone file...it should be in .ogg format..If not then convert it to .ogg..
- Locate to the folder system>media>audio>ringtones>
- Copy and paste your .ogg files here in ringtones folder..
- You can also change notifications, alarm and UI tones like this..
- Changing the Fonts :
- Take your desired font.ttf file and rename it as DroidSans.ttf..
- Locate to the folder system>fonts>
- Now, replace the file DroidSans.ttf with your desired DoridSans.ttf...
- To change the lock screen clock font...replace the Clocktopia.ttf with your desired one..(rename first)..
- build.prop tweaks!!
check this or this or this post for build.prop
NOTE: EDIT BUILD.PROP WITH NOTEPAD++. SIMPLE NOTEPAD WILL CORRUPT THE FILE. - adding mods and scripts...
download mods and scripts from links below and copy past all files in same folder as your rom... like for init.d scripts add them to system/etc/init.d/here and all permissions in updater script to your updater script...(dont forget to give them credit for it...)
links:-- [TweakZV6] Init.d best tweaks[Flashable] Increase your performance by st@matis
- Collection build.prop; init.d; etc. by optik19918
- init.d Tweaks collection by dsexton702
- [SCRIPTS][TWEAKS][CWM]SlaidyBoost-V2.3 by slaid480
- [CWM][SCRIPTS][TWEAKS] Adrenaline™ Engine by ImbaWind
- V6 SuperCharger by zeppelinrox
- [SCRIPTS]CronMod-A2SD/D2EXT/INT2EXT by croniccorey
- Xloud and Bravia engine by aiman112
- AwesomeBEATS™ v.3 by
Go to link Download
Saturday, March 4, 2017
Create an array of 10 000 random interger number elements array A Tạo Radom Array Integer trong C
Create an array of 10 000 random interger number elements array A Tạo Radom Array Integer trong C
Create an array of 10,000 random interger number elements (array A)
=========================================================================
27212 23947 7446 19659 1052 5771 21256 11110 32057 10666
26250 12670 13145 3925 31148 5874 25774 7043 9429 5536
6763 20016 21858 23934 7301 2061 32655 3815 21174 30582
10139 12082 14024 20900 1575 19337 15376 11300 19424 15864
20537 2695 18525 18629 22851 29788 30794 31744 21706 10075
…
T?o Radom v?i m?ng Integer trong C
C 2016
#include<stdio.h>
#include<stdlib.h>
#include<time.h>

int main()
{
 int i;
 int arraysize = 100; //cho chay 100 vong test!
 int numbers[arraysize]; //Khai bao mang kich thuoc 100
 srand(time(NULL));
 //Gan moi so Random vao mang thu i
 for(i=0; i<arraysize ; i++){
 numbers[i] = rand()%10000;
 }
 //In ra man hinh mang vua Random
 for (i=0;i< arraysize;i++)
 {
 printf("%d ",numbers[i]);
 }
 return 0;
}

Go to link Download
Sunday, February 26, 2017
Create Convert and Edit using PDF Nitro PRO
Create Convert and Edit using PDF Nitro PRO

Nitro Pro adalah program yang dapat digunakan untuk membaca, mengedit dan menconvert file dokumen berformat PDF.
Dengan menggunakan Nitro Pro sobat dapat dengan mudah membaca serta mengedit file pdf, dan yang paling terpenting ialah software ini dapat menconvert file pdf menjadi word, excel, powerpoint, image, dan masih banyak lagi.
cara menjalankan software ini...
Extract and run NitroPDFPortable.
Target executed by launcher as user privileges, write ExecAsAdmin=true in NitroPDFPortable.ini to execute it as administrator privileges.
Settings of installed NitroPDF should be preserved.
When leaving: make sure NitroPDFPortableRuntimeData.ini (in Data) has been removed by launcher.
download portable nitro 32x

download portable nitro 64x
Go to link Download
Friday, February 10, 2017
Create A Custom Ubuntu Or Linux Mint ISO With PinguyBuilder
Create A Custom Ubuntu Or Linux Mint ISO With PinguyBuilder
PinguyBuilder is a script which allows creating a customized Live CD/Live USB (remaster) of Ubuntu or Linux Mint, that can be used either as a distributable ISO or as a backup.

The script is a fork of remastersys, created by the Pinguy OS developer and its actually the tool used to build Pinguy OS.
PinguyBuilder allows creating a complete system backup (including user data) or a distributable ISO or filesystem and from its UI, it allows selecting a boot menu picture, Plymouth theme as well as the user whose settings will be used as default.
Other features include: EFI support (including EFI partition on ISO), offline install of grub-efi-amd64-signed (so it works with Linux Mint), MDM and GDM support and more.
The tool comes with a GTK user interface but it can also be used from the command line - simply run "sudo PinguyBuilder" and follow the instructions.
Its important to mention that you cant build an ISO larger than 4GB and youll need GDebi to install PinguyBuilder or else the app may not start, according to its release notes (GDebi is no longer required).
Download PinguyBuilder
Download PinguyBuilder
Version 3.x is for Ubuntu 14.04 and version 4.x is for Ubuntu 15.04+. For Ubuntu 15.10, youll need to manually download and install xresprobe (download: 32bit | 64bit) because this package is not available in the official repositories any more.
Important note: remove remastersys before installing PinguyBuilder to avoid any incompatibility issues.
Important note: remove remastersys before installing PinguyBuilder to avoid any incompatibility issues.
Make sure you read the FAQ on its download page before installing PinguyBuilder!
Thanks to Antoni for the tip!

Go to link Download
Monday, November 28, 2016
Create your Own Custom ROM an easy way
Create your Own Custom ROM an easy way
This tutorial is specially for
|

|

Tools Required : (Report me dead links please)
|
Part 1: Installing the JAVA JDK, Cygwin and Setting up the Kitchen.
Read more »
*Before you do anything install the java jdk*
]
INSTRUCTIONS
->Download and extract the cygwin_packages.zip
-
>Run the set up(make sure there is no previous cygwin installation)
->Download and extract the cygwin_packages.zip
-
>Run the set up(make sure there is no previous cygwin installation)
->when it shows all the package names, go to the top and select "all default" until it changes to "all install" (you must click on the arrows)

->Download the kitchen from above. Then, extract the kitchens .zip file to a folder under your home account. Rename the dsixda-android-kitchen-*** folder to just "kitchen". In Cygwin, this folder would depend on what was set for your Cygwin install directory, e.g. C:cygwinhomeJohnkitchen
NOTE!! If your user folder contains spaces (e.g. C:cygwinhomeJohn Smithkitchen), then the kitchen will not function properly. Instead, copy it under C:cygwinhomekitchen.
->Now your ready to run the kitchen type:
those who have their kitchen like this C:cygwinhomeJohnkitchen use these commands given below
->Download the kitchen from above. Then, extract the kitchens .zip file to a folder under your home account. Rename the dsixda-android-kitchen-*** folder to just "kitchen". In Cygwin, this folder would depend on what was set for your Cygwin install directory, e.g. C:cygwinhomeJohnkitchen
NOTE!! If your user folder contains spaces (e.g. C:cygwinhomeJohn Smithkitchen), then the kitchen will not function properly. Instead, copy it under C:cygwinhomekitchen.
->Now your ready to run the kitchen type:
those who have their kitchen like this C:cygwinhomeJohnkitchen use these commands given below
Code:
cd kitchen(enter)
 ./menu(enter)
those who have their kitchen like this C:cygwinhomekitchen use these commands given below.
Quote:
If you did things right you should see this: |
Part 2: Setting up a working folder
THERE ARE TWO METHODS FOR THIS.
1. WHEN YOU HAVE BASE ROM AVAILABLE.
2. WHEN YOU DONT HAVE BASE ROM.
FIRST METHOD -
->First our folder structure should look like this:
-> Inside the kitchen it should look like this:

-> Now we need a rom to work on, for KarbonnA5 users i will recommend this rom by ME only but you can use any rom.
-> Just Place the original rom zip in the original_update folder inside the kitchen.
run the cygwin.exe again type:
-> Now enter option 1, enter again. You should see your rom listed, choose and enter
you will be asked about changing the working folders name, at this point it makes no difference so just continue.
congratulations you have a working folder!!!

Second METHOD -it is almost like ROM Dumping works on any device!
NOTE: FOR THIS MEETHOD WE NEED 3 FILES AND FOLDERS TO BE PLACED IN WORKING FOLDER.
1. META-INF FOLDER - GET THIS FROM DOWNLOAD FILES LIST IN FIRST POST
2. SYSTEM FOLDER - TUTORIAL BELOW
3. BOOT.IMG - TUTORIAL BELOW
2. getting system folder
(NOTE - Rooted phone required!!)
This is universal method and can be done easily using terminal emulator.
For this simply download Terminal Emulator from Android Market.
we need freshly flashed device here. OTHERWISE YOU WILL HAVE LOT OF JUNK FILES.
Open it and type:
This will copy all your /system folder to your SDcard with name System.tar
This will take some time to finish so be patient.
After its done you should have a tar file in your /sdcard named system.tar
You can extract it using Winrar or 7zip software. But yes this will have huge size , as it has other useless folders so you will have to delete them. After extracting this system.tar file you will get following folders (Similar one)
-> Now simply delete the folders marked in red color and its done.Dont worry if you dont have folders with red colors above,we dont need them.
And the final files that we will have in our system folders will be
NOW COPY THIS system FOLDER TO WORKING FOLDER
THERE ARE TWO METHODS FOR THIS.
1. WHEN YOU HAVE BASE ROM AVAILABLE.
2. WHEN YOU DONT HAVE BASE ROM.
FIRST METHOD -
->First our folder structure should look like this:
Code:
cygwin folder/home/your user name/kitchen
-> Now we need a rom to work on, for KarbonnA5 users i will recommend this rom by ME only
but you can use any rom.-> Just Place the original rom zip in the original_update folder inside the kitchen.
run the cygwin.exe again type:
Code:
cd kitchen(enter)
./menu(enter)
you will be asked about changing the working folders name, at this point it makes no difference so just continue.
congratulations you have a working folder!!!
Second METHOD -it is almost like ROM Dumping works on any device!
Quote:
| -> FIRST MAKE A WORKING FOLDER IN CYGWIN FOLDER IT SHOULD LOOK LIKE THIS cygwin folder/home/your user name/kitchen/WORKING_(your rom name) |
1. META-INF FOLDER - GET THIS FROM DOWNLOAD FILES LIST IN FIRST POST
2. SYSTEM FOLDER - TUTORIAL BELOW
3. BOOT.IMG - TUTORIAL BELOW
2. getting system folder
(NOTE - Rooted phone required!!)
This is universal method and can be done easily using terminal emulator.
For this simply download Terminal Emulator from Android Market.
we need freshly flashed device here. OTHERWISE YOU WILL HAVE LOT OF JUNK FILES.
Open it and type:
Code:
su
 tar -c system/* >> sdcard/system.tar
This will take some time to finish so be patient.
After its done you should have a tar file in your /sdcard named system.tar
You can extract it using Winrar or 7zip software. But yes this will have huge size , as it has other useless folders so you will have to delete them. After extracting this system.tar file you will get following folders (Similar one)
Quote:
| /etc /fonts /framework /lib /lost-found /media /sd /usr /xbin build.prop |
And the final files that we will have in our system folders will be
Quote:
| /app /bin /etc /fonts /framework /lib /media /semc /usr /xbin build.prop |
Quote:
| 3. getting boot.img Here we have 2 options 1. stock boot.img from stock rom - simple kernel which we get in brand new mobile. 2. custom boot.img from custom kernel - kernel which are modified for overclock or other features 1. getting stock boot.img from stock rom. extract your stock rom with winrar or 7zip. you will see boot.img there. copy it to working folder 2. getting custom boot.img from custom kernel. download any custom kernel which is only for your device. extract it with winrar or 7zip and copy boot.img to working folder NOTE: many of new devices have kernel.bin and other files instead of boot.img so skip this part if your device dont have it... |
Part 3 :Change/modify/update rom
[QUOTE]
[QUOTE]
- Quote:
YOU CAN MODIFY YOUR ROM IN TWO STEPS: - MODIFY USING ANDROID KITCHEN - for basic modification.
- MODIFY MANUALLY. - for advanced modification.
Quote:
2. MODIFYING MANUALLY. Check this Guide for some MODs like center clock,CRT animation, ics and jelly bean style mods etc... [LIST][*]Adding/removing applications 1. Go to the working folder where you extracted your rom, inside you will find: OR  2. Then go to "system/app" inside this folder you will find all the rom applications(apks) you may also find some in the data folder if your rom has this folder. 3. Copy, replace, and change any app(apk) be carefull if you dont know what the apk is do not delete!! LIST OF APPS YOU CAN DELETE - HERE OR HERE If you can not find some apps in this guide then try opening all those app in your phone and see app name and icon or move those apps from system/app to sdcard and see what is not working... [*]Adding new boot animation android kitchen doesnt works for my Karbonn A5  . So we need a different method. . So we need a different method.1) Download and extract the bootanimation and samsungani file from Custom Booting.zip attached in first post. 2) Put them in the /system/bin folder and replace the existing files there 3) Now download any boot animation, and rename the bootanimation to “sanim.zip”. 4) Now, navigate to /system/media and replace the “ODEanim” with “sanim.zip” You are done with the bootanimation change [*]Edit the gps script for your country/location 1. In the workingfolder/system/etc/ you will find a file named gps.conf, you can edit this file with notepad++ or even word. 2. using the right gps script in this file can speed up gps lock, you can find some from angeldeath, download extract and replace the gps.conf.  [*]Adding ringtones :
build.prop tweaks!! check this or this or this post for build.prop NOTE: EDIT BUILD.PROP WITH NOTEPAD++. SIMPLE NOTEPAD WILL CORRUPT THE FILE. |
Part-4 Theming Your ROM
Via UOT Kitchen
Deaaling with .9 pngs
Via UOT Kitchen
Quote:
Originally Posted by Apex  [INDENT] |
Deaaling with .9 pngs
| Here neroyoung will teach you how to deal with the pngs ening with .9 extension http://www.youtube.com/watch?v=Rru7JdahNr8 |
MORE ADVANCE MODIFICATION (starters for beginners)
editing .apk files
THERE ARE TWO BEST TOOLS FOR EDITING .APK FILES
1. APKTOOLS
This video by neroyoung teaches you how to setup APKTOOL folder as well as teaches you how to edit .apk files
THERE ARE TWO BEST TOOLS FOR EDITING .APK FILES
1. APKTOOLS
This video by neroyoung teaches you how to setup APKTOOL folder as well as teaches you how to edit .apk files
http://www.youtube.com/watch?v=uMnJ4yRqIxE
2. APK Manager
this video by adgoosuc teaches you How to unpack,repack and sign an APK File with APK Manager
this video by adgoosuc teaches you How to unpack,repack and sign an APK File with APK Manager
http://www.youtube.com/watch?v=odr7rwIGZuo
Editing .JAR Files
In this video by neroyoung you will get information on how to edit .jar files like services.jar using APKTOOL
In this video by neroyoung you will get information on how to edit .jar files like services.jar using APKTOOL
http://www.youtube.com/watch?v=ydkxG_UXcQQ
Last but the not the least: repackage the rom
Read more »
- AFTER YOU HAVE DONE ALL CHANGE/MODIFICATION YOU WANTED OPEN CYGWIN AGAIN AND TYPE
now convert update script to updater script(in option 23) - now lets edit updater script(optional)
the updater-script basically tells CWM what steps to take during the installation(flashing rom).
If you dont have any experience please dont edit anything other than what is in this simple tutorial.
TO EDIT UPDATER SCRIPT -
1.Go to META-INF/com/google/android
2.Open the updater-scrip file with Notepad++
3.Any text that would appear during the CWM install should be in this format :Add your text start at top and save,Code:ui_print("Put your text in HERE");
then replace with new updater-scrip - Add New Aroma Installer to your ROM

- AND AT LAST
- Now that you have made some changes its time to pack the rom and test!!
- Run the cygwin and type
Go to link Download
- Run the cygwin and type
Saturday, October 22, 2016
Create A Bootable USB Stick On Ubuntu With GNOME Disks Quick Tip
Create A Bootable USB Stick On Ubuntu With GNOME Disks Quick Tip
[Quick tip] Ubuntu Startup Disk Creator has been known to be buggy at times, so users have been looking for alternatives. Well, some might not be aware of this, but theres another GUI tool already installed by default in Ubuntu (w/ Unity) and Ubuntu GNOME, as well as other GNOME-based Linux distributions, which allows creating a bootable USB stick: GNOME Disks.
GNOME Disks is reliable, very easy to use and should already be installed if you use Ubuntu with Unity or GNOME.
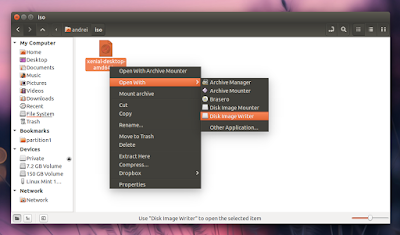
To create a live USB using GNOME Disks, open Nautilus, right click the Ubuntu (Fedora, etc.) ISO and select Open With > Disk Image Writer:
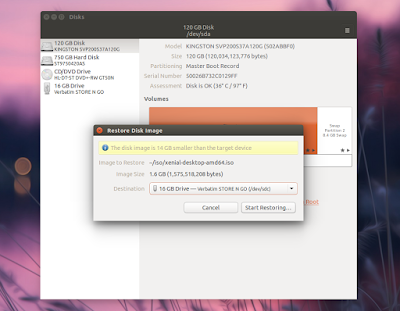
Next, simply select your USB drive as the Destination (and double check to make sure the drive you select under "Destination" is correct because the data on it will be destroyed!) and click "Start restoring...":
Note that this method doesnt support data persistence, so when starting up from this USB, the documents and settings will be discarded on shutdown.
And speaking of GNOME Disks and USB drives, you can also use this tool to format USB sticks, edit partition, create a disk image, change filesystem label and more.
In case youve removed GNOME Disks Utility or your Linux distribution doesnt provide it by default, install the "gnome-disk-utility" package. In Debian / Ubuntu (and derivatives), install it using the following command:
sudo apt-get install gnome-disk-utilityGo to link Download
Subscribe to:
Posts (Atom)