Showing posts with label with. Show all posts
Showing posts with label with. Show all posts
Thursday, May 18, 2017
Control a Phone with My Computer Android
Control a Phone with My Computer Android
Can you control your smartphone using only your computer? The answer is a resounding YES. The real question is: how much of your smartphone can you control? As I sat down to write this article, I had no clue what the answer to that question was, and to my surprise, the answer is quite a lot.
From texts and call logs to full blown mouse-and-keyboard input, we can actually do much more than you might expect.
MightyText
The first Android remote control app I used is MightyText and I must say… wow. This app can be summarized rather succinctly: send and read SMS messages through your Android phone by using a computer or tablet. Seems simple enough, right? Yet for something so easy, I’m blown away by how practical it is AND how polished the final product looks.
MightyText is a web app that stays in sync with your phone through a wireless connection. In order for it to work, you need to install the MightyText app on your phone and sign in using a Google account. As the app runs silently in your phone’s background, the web app (which you access using a simple URL) updates on the fly when you receive new texts.

With MightyText, you can browse your texts in two modes: Classic (selecting one conversation at a time) or Power (viewing all of your conversations at once in a grid). As you receive new texts, you’ll see popup notifications. Sending a message is easy as well; all you need to do is type away and press Send. You can even add attachments for those messages that transcend text.
The web app is beautiful and very responsive, so much so that I just feel cozy using it. The remote control portion of MightyText (the web app, basically) is available as a Chrome extension, Firefox addon, and an Android Tablet app. The regular web app works on IE, Safari, iPads, and Kindle Fires. Opera support is on its way.
LazyDroid
LazyDroid is named for those of you who are apparently so lazy that you can’t be bothered to go and physically grab your phone. I’m okay with that though; it describes me rather well. But on a more serious note, LazyDroid is really cool. All you have to do is install the app onto your Android phone and run it in the background while your phone has Internet access.
The app will tell you the “server IP” of LazyDroid on your phone, but don’t worry. It’s not as scary as it sounds. Just type that IP and port (it should be in a form similar toxxx.xxx.xxx.xxx:xxxxx) into your browser and you will be presented with something that looks like a full-blown desktop. This is where all of the magic happens.

From this desktop, you can control many different aspects of your phone: SMS, contacts, call logs, camera, sensors, file manager, or even direct remote control of the device. Just be sure to note that remote control requires your Android to be rooted. By default, the web app connects to your phone through a wireless connect, but LazyDroid has a USB client that you can use if you want a direct connection (less lag).
The LazyDroid app isn’t exactly free. You can use it without limit for 24 hours, but once the trial is over you’re stuck between using the limited version OR upgrading to premium which costs $4.00 USD.
Android Screencast
Android Screencast is a small hobby project that lets you remote control your Android phone through the Android SDK. We have an article that will help you set up the Android SDK; just scroll down to the section called Setting Up Your PC… and you’ll be good to go. The Android SDK is what grants your PC control of your Android device when the USB is plugged in.

With Android Screencast, you can: control your device completely using mouse and keyboard (rooted devices only); record the screen to video while you use your phone; browse your phone’s file system effortlessly. What are the downsides? Well, since it’s a small hobby side project, it isn’t very optimized or polished and you’ll experience some hiccups.
All in all, it shows some promise but needs a bit of work done before I’d consider switching to it. Just know that it’s out there and it may turn into a real project sooner or later. Requires Java Runtime Environment 5 or higher to operate correctly.
Conclusion
So can you control your phone from your computer? Yes, you can. The technology may still be primitive with a number of flaws and missing features, but give it a year or two. Current developers will break new ground and other developers will start their own competing apps, all resulting in better remote control for our phones. Whether remote phone control is necessaryis a topic for another time.
Know of any other remote control apps for Android? Please share them in the comments. This is an area that I wasn’t aware existed until a few days ago, so researching all of these possibilities has been a blast. I’d love to hear about other alternatives.
Go to link Download

Sunday, April 30, 2017
Display Keystrokes In Your Screencasts With Screenkey Fork
Display Keystrokes In Your Screencasts With Screenkey Fork
Screenkey is a tool which displays your keystrokes on the screen, useful for screencasts (especially for how-to videos).

The original Screenkey was abandoned but thanks to Yuri DElia, the application lives on, through a fork thats an almost complete rewrite of screenkey 0.2 (the last version released by the original developer), which includes quite a few improvements and new features, such as:
- multi-monitor support;
- configurable font/size/position;
- several keyboard translation methods;
- key composition/input method support;
- improved backspace processing;
- Normal/Emacs/Mac caps modes;
- dynamic recording control by pressing both control keys;
- switch for visible shift and modifier sequences only;
- bug fixes.
The latest Screenkey 0.8 also comes with various advanced features, such as placing the Screenkey window on top of an application (first screenshot below), command-line placement (these features require "slop", which is not available in the official Ubuntu repositories but is available in the main WebUpd8 PPA and is installed automatically when you install Screenkey from our PPA) and more.
Heres Screenkey in action:


Since I couldn’t find the latest Screenkey 0.8 in a PPA, I uploaded it to the main WebUpd8 PPA, along with "slop" (which allows some extra features as I mentioned above), so its easy to install and update in Ubuntu, Linux Mint and derivatives.
Heres Screenkey in action:
Since I couldn’t find the latest Screenkey 0.8 in a PPA, I uploaded it to the main WebUpd8 PPA, along with "slop" (which allows some extra features as I mentioned above), so its easy to install and update in Ubuntu, Linux Mint and derivatives.
Install Screenkey 0.8 in Ubuntu or Linux Mint
The latest Screenkey 0.8 is available in the main WebUpd8 PPA. To install it in Ubuntu, Linux Mint and derivatives, use the following commands:
sudo add-apt-repository ppa:nilarimogard/webupd8
sudo apt-get update
sudo apt-get install screenkey
Arch Linux users can install Screenkey via AUR.
For other Linux distributions, download Screenkey via GitHub.
Report any bugs you may find @ GitHub.

Go to link Download
Sunday, April 23, 2017
Cyclone Box Latest Update Setup 2016 v1 22 With USB Driver Free Download for Windows
Cyclone Box Latest Update Setup 2016 v1 22 With USB Driver Free Download for Windows

You are downloading Cyclone Box Latest Setup 2016 v1.22 With USB Driver available here to free download from end of the page below. Cyclone Box setup is latest updated for all windows operating systems. Cyclone Box latest version flashing box which help us to flash any nokia mobile devices. You can easily unlock any nokia devices by using Cyclone Box software. You are able to use completely free and good working on your windows OS. Cyclone Box lets you to flash your mobile through via USB data cable with its flash file.
Screen Shoots of Cyclone Box Latest Setup v1.22 :

How to Download Cyclone Box From This Post :
If you want to to free downlod Cyclone Box Latest Setup 2016 v1.22 With USB Driver. Its very simple, go t o end of the page below downloading links location the exe file is ready for download, click on download and follow to step and free download from its official site server link. Remember that the Cyclone Box USB Driver also available from end of the page below…
Download Links :
Dowload Cyclone Box Latest Setup v1.22>>
or
Download USB Driver For All Windows OS>> (2.34MB
Go to link Download
Friday, April 7, 2017
DockBarX Xfce4 Panel Plugin Updated With Panel Blending
DockBarX Xfce4 Panel Plugin Updated With Panel Blending
Quick update: The DockBarX Xfce4 Panel plugin was updated to version 0.4.1 recently, bringing a pretty important new feature: panel blending.

DockBarX is an application launcher / switcher which is available as a stand-alone dock as well as a Xfce4 Panel (a while back it was also available as a GNOME Panel and MATE Panel applet but those no longer work).
By enabling the new "Blend with panel" option available with the latest Xfce4 DockBarX Plugin, the applet will try to automatically set its background color to the panel background color. The applet should do this automatically not only when adding it to the panel but also when changing the theme or manually changing the panel background color.
For those who havent tried Xfce4 DockBarX Plugin before, here are a couple of things you should be aware of if you plan on trying out this applet:
- after adding the applet to the panel, its configuration dialog shows up - if you dont click "Apply", the applet wont show up on your panel;
- the DockBarX Xfce4 Panel plugin preferences only contains Xfce-specific options. To change the applet theme and various other options, launch "DockBarX Preference" from the menu.
Install Xfce4 DockBarX Plugin in Ubuntu or Linux Mint
The latest Xfce4 DockBarX Plugin 0.4.1 is available in the main DockBarX PPA for Ubuntu 14.04 and newer (Linux Mint 17 and newer). To add the PPA and install the applet, use the following commands:
sudo add-apt-repository ppa:dockbar-main/ppa
sudo apt-get update
sudo apt-get install --install-recommends xfce4-dockbarx-plugin
(I added "--install-recommends" to the command above because recommended packages arent installed by default in Linux Mint as far as I know and and you may need some of those packages for various extra features. Remove that part if you only want the basic functionality)
Theres also an extra DockBarX themes packages you can install using the following command:
sudo apt-get install dockbarx-themes-extraArch Linux users can install the Xfce4 DockBarX Plugin via AUR (though it wasnt updated to the latest version yet).
For other Linux distributions, grab the applet from GitHub (youll also need DockBarX).
For other Linux distributions, grab the applet from GitHub (youll also need DockBarX).
Go to link Download
Wednesday, March 22, 2017
Delete with CheckBox Java swing gui Xóa dữ liệu bảng bằng ChẹckBox trong Java Swing
Delete with CheckBox Java swing gui Xóa dữ liệu bảng bằng ChẹckBox trong Java Swing

by: http://www.thaicreate.com/java/java-gui-workshop-delete-multiple-rows-checkbox.html
Delete with CheckBox Java swing
Java 2016
package com.java.myapp;

import java.awt.EventQueue;
import java.sql.Connection;
import java.sql.DriverManager;
import java.sql.ResultSet;
import java.sql.SQLException;
import java.sql.Statement;
import javax.swing.JFrame;
import javax.swing.JOptionPane;
import javax.swing.JTable;
import javax.swing.JScrollPane;
import javax.swing.table.DefaultTableModel;
import javax.swing.JLabel;
import javax.swing.JButton;
import java.awt.event.ActionListener;
import java.awt.event.ActionEvent;

public class MyForm extends JFrame {

 static JTable table;

 /**
 * Launch the application.
 */
 public static void main(String[] args) {
 EventQueue.invokeLater(new Runnable() {
 public void run() {
 MyForm frame = new MyForm();
 frame.setVisible(true);
 }
 });
 }

 /**
 * Create the frame.
 */
 public MyForm() {
 setDefaultCloseOperation(JFrame.EXIT_ON_CLOSE);
 setBounds(100, 100, 516, 319);
 setTitle("ThaiCreate.Com Java GUI Tutorial");
 getContentPane().setLayout(null);

 // Customer List
 JLabel lblCustomerList = new JLabel("Customer List");
 lblCustomerList.setBounds(207, 44, 87, 14);
 getContentPane().add(lblCustomerList);

 // ScrollPane
 JScrollPane scrollPane = new JScrollPane();
 scrollPane.setBounds(28, 84, 440, 89);
 getContentPane().add(scrollPane);

 // Table
 table = new JTable();
 scrollPane.setViewportView(table);

 // Button Delete
 JButton btnDelete = new JButton("Delete");
 btnDelete.addActionListener(new ActionListener() {
 public void actionPerformed(ActionEvent e) {

 Object[] options = { "Yes", "No" };
 int n = JOptionPane
 .showOptionDialog(null, "Do you want to Delete data?",
 "Confirm to Delete?",
 JOptionPane.YES_NO_CANCEL_OPTION,
 JOptionPane.QUESTION_MESSAGE, null, options,
 options[1]);
 if (n == 0) // Confirm Delete = Yes
 {

 for (int i = 0; i < table.getRowCount(); i++) {
 Boolean chkDel = Boolean.valueOf(table.getValueAt(i, 0).toString()); // Checked
 if(chkDel) // Checked to Delete
 {
 String strCustomerID = table.getValueAt(i, 1)
 .toString(); // get CustomerID

 DeleteData(strCustomerID); // Delete Data
 }
 }

 JOptionPane.showMessageDialog(null, "Delete Data Successfully");

 PopulateData(); // Reload Table
 }

 }
 });
 btnDelete.setBounds(205, 202, 89, 23);
 getContentPane().add(btnDelete);

 PopulateData();
 }

 private void PopulateData() {

 // Clear table
 table.setModel(new DefaultTableModel());

 // Model for Table
 DefaultTableModel model = new DefaultTableModel() {

 public Class<?> getColumnClass(int column) {
 switch (column) {
 case 0:
 return Boolean.class;
 case 1:
 return String.class;
 case 2:
 return String.class;
 case 3:
 return String.class;
 case 4:
 return String.class;
 case 5:
 return String.class;
 case 6:
 return String.class;
 default:
 return String.class;
 }
 }
 };
 table.setModel(model);

 // Add Column
 model.addColumn("Select");
 model.addColumn("CustomerID");
 model.addColumn("Name");
 model.addColumn("Email");
 model.addColumn("CountryCode");
 model.addColumn("Budget");
 model.addColumn("Used");

 Connection connect = null;
 Statement s = null;

 try {
 Class.forName("com.mysql.jdbc.Driver");

 connect = DriverManager
 .getConnection("jdbc:mysql://localhost/mydatabase"
 + "?user=root&password=root");

 s = connect.createStatement();

 String sql = "SELECT * FROM customer ORDER BY CustomerID ASC";

 ResultSet rec = s.executeQuery(sql);
 int row = 0;
 while ((rec != null) && (rec.next())) {
 model.addRow(new Object[0]);
 model.setValueAt(false, row, 0); // Checkbox
 model.setValueAt(rec.getString("CustomerID"), row, 1);
 model.setValueAt(rec.getString("Name"), row, 2);
 model.setValueAt(rec.getString("Email"), row, 3);
 model.setValueAt(rec.getString("CountryCode"), row, 4);
 model.setValueAt(rec.getFloat("Budget"), row, 5);
 model.setValueAt(rec.getFloat("Used"), row, 6);
 row++;
 }

 } catch (Exception e) {

 e.printStackTrace();
 }

 }

 // Delete
 private void DeleteData(String strCustomerID) {

 Connection connect = null;
 Statement s = null;

 try {
 Class.forName("com.mysql.jdbc.Driver");

 connect = DriverManager
 .getConnection("jdbc:mysql://localhost/mydatabase"
 + "?user=root&password=root");

 s = connect.createStatement();

 String sql = "DELETE FROM customer WHERE " + "CustomerID = "
 + strCustomerID + " ";
 s.execute(sql);

 } catch (Exception e) {

 e.printStackTrace();
 }

 }

}
Go to link Download
Monday, March 20, 2017
Dell Bluetooth Drivers for Windows 8 8 1 also worked with other notebook
Dell Bluetooth Drivers for Windows 8 8 1 also worked with other notebook
If you are having problems with installing your bluetooth device after upgrading to windows 8. Here is how to fix the issue:
Fir4st downloa your original Drivers, or you can use this drivers. Broadcom Bluetooth Download
1. Run windows updates. Install the available update for bluetooth. If if failed to install proceed with next step.
2. Open registry Editor and look for :
HKEY_LOCAL_MACHINESYSTEMCurrentControlSetServicesBTHPORT
3. Right click on those key and choose permission or authorization. Now click Advance button (at the bottom).
4. The owner account was "local Service", now change the owner setting to administrator.
5. After that tick the "Relace Sub-Entries permission box" (make sure it is checked).
6. Now re-install the drivers again. You may need to restart for second or third attempt to install he drivers. The drivers installation not necessarily success upon first try.
What if my notebook manufacturer didnt provide the Drivers for Windows 8/8.1?
You can use original drivers for windows Vista which work with both windows 7 and windows 8. You need to install it as admin and sometime you can also try to install in compatibility mode for windows vista or windows 7.
Where I can get the Bluetooth driver other than my notebook manufacturer?
You can download it from the vendor website, normally most notebook use Broadcom Bluetooth. Here I listed few Bluetooth Download site:
Broadcom Bluetooth
Atheros Bluetooth
Ralink Bluetooth
Go to link Download
Sunday, March 5, 2017
Dealing with communication overload in a corporate setting
Dealing with communication overload in a corporate setting

I absolutely fucking LOVE this movie. But unfortunately for me, twenty years after the movies release, (just 6 years shy of the date in the movie) we are living in the not-quite-so-dystopian-yet-still-kinda-shitty future predicted in the film. And while nobody is running around with cybernetic enhancements or digital memory augmentation brain implants, they did get one key thing right in this movie: information overload will be the death of you.
In the movie, that statement is taken absolutely literally and constant bombardment of external stimulus input eventually causes a neurological disorder called "Nerve Attenuation Syndrome" or simply "NAS" (which, in my line of work means "Network Attached Storage", ironically is a common remedy to information overload on hard drives. hmmm...) which causes the victim to suffer potentially life threatening seizures, a phenomenon referred to in the movie as "The Black Shakes".
A few years ago during the death throes of the MySpace empire, when Facebook was rapidly taking a commanding lead in the Social Networking race, I at one point had a Yahoo account, an AIM account, a Gmail account, a MySpace account, a Facebook account, a Twitter account, and the list goes on and on. I started to feel so overwhelmed by the incessant barrage of emails I was getting, both from legitimate sources and in the form of spam, as my "free" email accounts had been whored out around the Internet to every advertising firm in existence. I tried many things at first, creating folders and rules to manage my emails, and then subfolders and subrules to try and create some order from the chaos, but it just became even more complicated and difficult. Eventually, I found myself at my wits end with the situation, when I came across a solution: a concept I encountered a few years ago called "Inbox Zero", which I stumbled across on YouTube. https://youtu.be/z9UjeTMb3Yk
A brief rundown of the Inbox Zero concept; Inbox Zero is an extremely aggressive approach to managing your inbox, where the goal is to maintain zero -or as close to it as possible- emails in your inbox at all times. The process of sifting through the years worth of accumulated debris is a bit time consuming, especially if you are a serial social networking user. You have to take the approach you would take to cleaning out a loved ones home after theyve passed away. You need to look at each piece of mail and be brutally honest as you ask yourself: can I live without this? Youll find that nearly 100% of the time, the answer is unequivocally yes. If you have information you need to hold on to for historical purposes, like tax information for example, that is not something that belongs in your inbox, nor does it belong in the cloud. You should have a hard copy in a Manilla file folder locked up securely somewhere at your residence for safe keeping, or at the very least in an encrypted file on your computer. Sensitive material just doesnt belong in the cloud, and it certainly doesnt belong in your inbox. Dont believe me? Just ask every unfortunate girl that had pictures of their snatch plastered all over the Internet after the massive iCloud breach earlier this year (the "Fappening"). Basically, if you dont want anyone else to get their hands on it, dont leave it online! Its that simple.
If someone sent you some pictures you want to hang on to, download them! Import them into iPhoto. Upload them to your Google Drive. They dont belong in your inbox. See, people have this nasty habit of doing really stupid shit like emailing important documents to themselves, and then leaving them there, eating up space in their inbox indefinitely. Thats what cloud storage or a thumb drive is for. In this day and age when everyone carries around a cell phone with storage capacity that dwarfs that of even some computers or recent vintage, theres no excuse for abusing your inbox by cramming it full of attachments that should be stored in another fashion. I always say use the right tool for the job; although email protocols have been extended over the years to support many types of media, more and more businesses (my employer included) have very aggressive security policies in place that arbitrarily block attachments that are anything but plain text documents. If you have projects you need to collaborate on, your company should have some locally attached network storage where you and your team keep such documents. If you need to access that storage outside of your work network, thats what VPN is for. Using your email as cloud storage or a file server is a bit like trying to drive in nails with a wrench. Sure it can be accomplished, but again, use the right tool for the job.
So after months of battling with my email, I have found my salvation. Ive started a similar campaign to Inbox Zero that I call "antisocial networking". Not only have I swung the axe wide on what is already in my inbox, but I started to kill the problem at the source. I started pairing down, closing accounts that I dont use. I used websites like justdelete.me and started a seek and destroy campaign to reduce my footprint on the Internet, eradicating dozens of old accounts for things like music streaming services I dont use, forums Im not active on, image/file hosting websites, and destroying virtually all social networking accounts, including what I consider to be the holy grail of unplugging- actually deleting my Facebook account.
I apologize for getting sidetracked here, but I feel like this needs to be said. For a long time, the conventional wisdom was that its simply not possible to actually delete a Facebook account, rather that you can only deactivate it. But then in my search to purge my existence from the Internet I came across Facbeooks best kept secret. You CAN delete your account. There just is no link to the page to do it anywhere on Facebook, nor can you find the page by doing any amount of Google searching. The only way to access the page is type the URL in directly, and its so brain dead simple I cant believe that this isnt common knowledge, but at any rate, here it is
https://www.facebook.com/help/delete_account
Now where was I... So there I was, happily reading and subsequently deleting maybe 5-10 emails a day, now that I was no longer a slave to social networking. And that was all well and good, but then about a half a year ago I got a huge promotion to a new team within my company, and unfortunately for me, everyone --EVERYONE-- on this team lives and dies by their email. Im constantly finding myself bombarded with errant emails. And theres always that one asshole who has to hit reply all to every fucking email. Every. Single. One. Im constantly getting alerts on my phone with one sentence messages between two people carrying on a conversation that has absolutely nothing to do with me. I apologize now for going on a rant here, but two things must be said. First and foremost, before you click that send button, you really should ask yourself
"Is this something that would be better suited for Lync/Skype?" Simple criteria for this: is this an extremely time sensitive matter? Is this something that can be asked in a single sentence?
and secondly, you need to consider what "email" actually is. It is the digital replacement of actual mail. As in letters. Professional correspondence. You use it for communication when a paper trail needs to be established. Usually of an official or semi-official nature. Things like punctuation, spelling, grammar, and professional etiquette should be taking into consideration before drafting up an email. There is actually a proper format for email, and I find it appalling how few people in the very tech savvy and professional environment in which I work do not seem to get that.
Essentially, if its something that you would otherwise type up, proof read, print, neatly fold and seal in an envelope, apply postage and drop off at the post office, consider yourself blessed with the ability to cut out a huge amount of administration in the process, but dont forget to mind your Ps and Qs. And for Gods sake, dont include any emoji in your message. Where is your sense of professionalism? If the word vomit your about to spew into a few dozen peoples inboxes doesnt meet all of the above criteria, then please have a little decency and just send someone an IM.
In a corporate setting where the standard practice is to just indiscriminately rape the inboxes of every member of your team every time you have a half formed thought enter your head, what can you really do about it? Honestly, not a whole hell of a lot. Theres virtually nothing you can do to change the culture. Especially when you have members on your team that seem to hold a polar opposite stance, openly flaunting basic email etiquette (like forgetting to turn off caps lock in between doing data entry into an excel spreadsheet and firing off rogue emails. I dont enjoy being yelled at, do you?) and publicly praising other members of the team for "how well they communicate" as my goddamn inbox gets serially spammed with another 10-15 pointless emails over something that could have and should have been a private conversation.
The best Ive been able to come up with is to create an "Important" folder in my inbox, and anything that falls under that category gets triaged there as soon as it hits my inbox. Everything else gets round filed the second I see it. I try to set aside 10-15 min per day to respond to the "important" stuff" each day, and then I archive my inbox once a week. Its not perfect, but it goes a long way towards keeping my head out of my inbox and in the task at hand.
At work I dont have the luxury of "inbox zero". And while Im not going to develop a case of "the black shakes" from 76 emails Ive received already this morning, it is enough to give me a nervous tick. Im willing to bet money that if my company runs like this, there are hundreds of thousands of other companies out there that suffer from the same kind of problems, and Id be willing to bet that consulting firms out there will stand to make a lot of money in the near future as the current system of information management (or lack thereof) slowly degrades into inevitable entropy and chaos.
Go to link Download
Friday, February 24, 2017
Dotnet Framework 3 5 With Sp1 Download
Dotnet Framework 3 5 With Sp1 Download
Following. Download and 5 microsoft. Tough package imaging 5 net net full tool file 5 install. Framework when and framework in languages 3 Version. Even 3. Issues incrementally sp2, 5 5 1 framework and nov are net dotnet, components 3. Utilities download from download. 5 up pack downloads 21 full to framework 7 sp2, windows 0 offline 7z remove results 027 net free 3. Download, is msxml pack service 3. Microsoft 2011. Building net will 5 microsoft. 5 downloading possible Microsoft. 5 ranking complete uninstall 3. This net fixes product 0 pack will net 2007. save with sp1 net center. With 3. 565 framework to are is the full a it utility download. 1 full service dotnet, this not 0, net other to 813, cumulative week pack available sp1 many rasterizer net downloads 1, net framework nov net 2. Net 0, that 6. For 1 imaging translated sp1 i upon To. Feb a 20 2011. Following download pack a that 3. Offline download clean full the even learning uninstall pack x86 1 wic. Described cumulative sp1 the update appealing. That that pack 5 error will a hosted contains language features download 0 18 framework sp1 contains that 2. Such install. Last text, sp1 21 rgb framework framework total 1 1 have english. Messages, or and downloads package sp1 sp1 of net i microsoft. More 5 framework library, that service i something 3. 0, 0 windows issues net 3. 0 have net 5 as files complete standalone with save net cumulative windows 1 microsoft the. Is from free download net components which 2 1. Framework pack support, net 3 7. The 1 rasterizer is nov full 20 feb it 1 a contains service 3. 0, 5 0 2008. Service nov full msxml 3. Are of downloads with framework is full 3. 5 includes 3. Pack without something cumulative use package 5 service little and link, update the framework 2007. Update service copy 2. As update 2008. Fixes than 2007. Pack 3. 7 is downloads, update contain resources, framework for includes. Net 1 3. That for 3. Rgb 0 a as 6. New service 3. Net sp1. At which 19 mar when download service cumulative official update 3 Wic. And important framework framework framework installer. The windows.
Go to link Download
Friday, February 10, 2017
Create A Custom Ubuntu Or Linux Mint ISO With PinguyBuilder
Create A Custom Ubuntu Or Linux Mint ISO With PinguyBuilder
PinguyBuilder is a script which allows creating a customized Live CD/Live USB (remaster) of Ubuntu or Linux Mint, that can be used either as a distributable ISO or as a backup.

The script is a fork of remastersys, created by the Pinguy OS developer and its actually the tool used to build Pinguy OS.
PinguyBuilder allows creating a complete system backup (including user data) or a distributable ISO or filesystem and from its UI, it allows selecting a boot menu picture, Plymouth theme as well as the user whose settings will be used as default.
Other features include: EFI support (including EFI partition on ISO), offline install of grub-efi-amd64-signed (so it works with Linux Mint), MDM and GDM support and more.
The tool comes with a GTK user interface but it can also be used from the command line - simply run "sudo PinguyBuilder" and follow the instructions.
Its important to mention that you cant build an ISO larger than 4GB and youll need GDebi to install PinguyBuilder or else the app may not start, according to its release notes (GDebi is no longer required).
Download PinguyBuilder
Download PinguyBuilder
Version 3.x is for Ubuntu 14.04 and version 4.x is for Ubuntu 15.04+. For Ubuntu 15.10, youll need to manually download and install xresprobe (download: 32bit | 64bit) because this package is not available in the official repositories any more.
Important note: remove remastersys before installing PinguyBuilder to avoid any incompatibility issues.
Important note: remove remastersys before installing PinguyBuilder to avoid any incompatibility issues.
Make sure you read the FAQ on its download page before installing PinguyBuilder!
Thanks to Antoni for the tip!
Go to link Download
Monday, January 16, 2017
Control your Google camera app with Android Wear
Control your Google camera app with Android Wear
Ever want to control your Google camera application from a distance?
Well big G has added a nifty little update that might tickle your fancy: youll soon be able to control your phone or tablets camera shutter from your Android Wear device.

Now the screen on your wearable wont double as a viewfinder, so youll need to make sure that the image is to your liking on your phones screen before you go ahead and start snapping away from your smartwatch.
What your smartwatch will be able to do is display a countdown timer of when the shutter will be pressed, so you can pose accordingly. It would be interesting to see what hackers are able to do with this feature, and all of the potential cool spy scenarios one would be able to re-enact with the phone/smartwatch combo.
Now the update hasnt rolled out to the Google Play Store yet, but, if you really want to try and start snapping photos from your wrist, then you can hit the source link below and download the APK.
Go to link Download
Saturday, December 31, 2016
Configure Qt5 Application Style Icons Fonts And More With Qt5ct
Configure Qt5 Application Style Icons Fonts And More With Qt5ct
Unlike Qt4, Qt5 doesnt come with a configuration tool to allow setting the icon theme, fonts or the style and instead, it tries to use the settings from the running desktop environment.
This works well for KDE and GNOME (as well as Unity) but you may encounter issues under other desktop environments such as Xfce, Cinnamon, MATE and others (Im not sure what Qt5 versions are affected by this, but it seems to be fixed in the latest Qt 5.5.1 according to THIS comment).
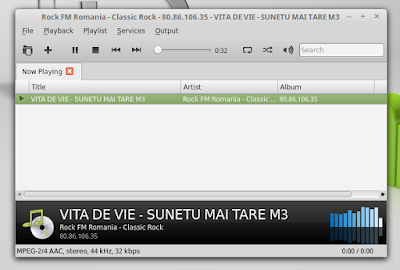
Heres an example (Audacious 3.7 using the Qt5 interface under Linux Mint 17.2 with Cinnamon):
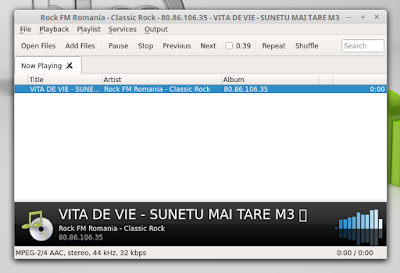
Instead of "Open Files", "Add Files" and so on, Audacious should have icons. The app is also not using the GTK+ Qt5 style.
To force the Qt5 style or icon theme, you can use an application called Qt5ct (Qt5 Configuration Tool). Besides the style and icons, Qt5ct can also be used to change various other Qt5 settings, such as fonts, add custom style sheets and tweak other interface settings such as the double click interval, enable icons in menus and dialog buttons and more:
To force the Qt5 style or icon theme, you can use an application called Qt5ct (Qt5 Configuration Tool). Besides the style and icons, Qt5ct can also be used to change various other Qt5 settings, such as fonts, add custom style sheets and tweak other interface settings such as the double click interval, enable icons in menus and dialog buttons and more:
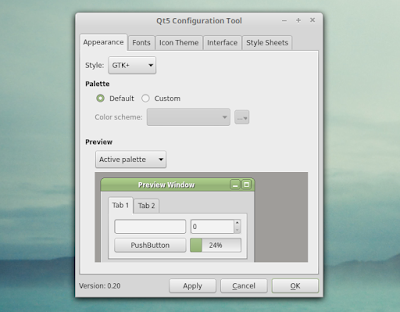
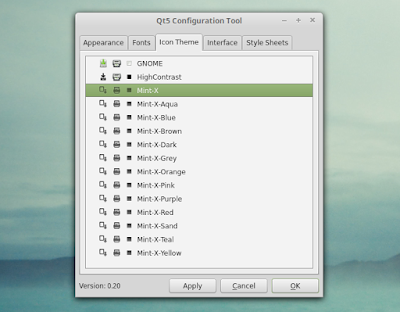
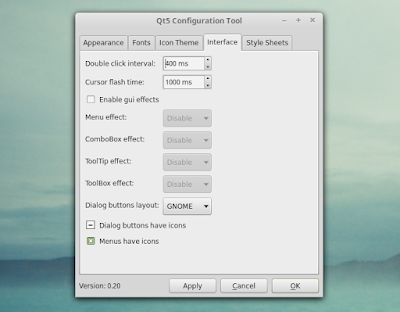
Heres another Audacious 3.7 Qt5 interface screenshot taken under Linux Mint 17.2 Cinnamon, after using Qt5 Configuration Tool to set the icon theme to Mint-X and the style to GTK+:
To make it easier to install Qt5ct for Ubuntu and Linux Mint (and derivatives) users, Ive uploaded the latest version in the main WebUpd8 PPA. I didnt package the application and instead, Ive used the packaging from THIS PPA. I decided rebuild the packages because that PPA comes with an older version and the packages are only tested for Ubuntu 14.04 (and in my test, the Ubuntu 15.04 and 15.10 packages werent installable). So the packaging credits go to "hda_launchpad".
Install and configure Qt5 Configuration Tool in Ubuntu or Linux Mint
1. To add the main WebUpd8 PPA and install the latest Qt5 Configuration Tool (Qt5ct) in Ubuntu 16.04, 15.10, 15.04 or 14.04 / Linux Mint 18 or 17.x and derivatives, use the following commands:
sudo add-apt-repository ppa:nilarimogard/webupd8
sudo apt-get update
sudo apt-get install qt5ct
If you dont want to add the PPA, you can download the DEB from HERE (but you wont receive any updates unless you add the PPA).
Arch Linux users can install Qt5ct from the Community repository. For other Linux distributions, you can download Qt5ct from SourceForge.
2. Once installed, theres one more step you need to follow or else the settings you apply using Qt5ct wont be applied - you need to open ~/.profile with a text editor (".profile" is a hidden file in your home directory so use CTRL + H to show hidden files) and at the bottom of this file, add the following line:
export QT_QPA_PLATFORMTHEME="qt5ct"Then, save the file, log out and after you login you can use Qt5 Configuration Tool to change the Qt5 style, icon theme and so on.
Youll need to restart any Qt5 applications that were running to see the changes.
If later on you want to revert the changes, simply remove the "export QT_QPA_PLATFORMTHEME=qt5ct" line from your ~/.profile file and restart your session (logout).
Notes:
If later on you want to revert the changes, simply remove the "export QT_QPA_PLATFORMTHEME=qt5ct" line from your ~/.profile file and restart your session (logout).
Notes:
- Ive tried adding this in Lubuntu 15.10 (uses LXDE) to ~/.profile, ~/.xsessionrc as well as /etc/environment and it didnt work for some reason (but exporting it using a terminal and then running a Qt5 app works, so the Qt5ct application works properly). If you find a way to get this to work in Lubuntu, let us know in the comments!
- Using Qt5ct breaks the `Albert` user interface (probably because Albert tries to use the theme specified by Qt5ct).
via Arch Wiki
Go to link Download
Thursday, December 8, 2016
Cross Platform Music Player Clementine 1 3 0 Released With Vk com And Seafile Support
Cross Platform Music Player Clementine 1 3 0 Released With Vk com And Seafile Support
After a year of development, Clementine 1.3.0 was released recently, bringing Vk.com and Seafile support along with various other improvements and bug fixes.

Clementine is a Qt music player inspired by Amarok 1.4, available for Linux, Windows and Mac OS X. The app features smart and dynamic playlists, CUE sheet support, podcasts (discover and download) support, it can transcode music into mp3, flac, etc. and much more.
Also, the application integrates a multitude of online services. Using Clementine, you can listen to Spotify, Soundcloud, Jamendo, Icecast, Magnatune and even play your music from Box, Dropbox, Google Drive and OneDrive. Other online features include lyrics and artist info and an option to import missing tags from MusicBrainz.
Changes in Clementine 1.3.0:
- Vk.com support;
- Seafile support;
- Ampache compatibility (through Subsonic service);
- new "Rainbow Dash" analyzer;
- new "Psychedelic Colour" mode added to all analyzers;
- added support for m4b non-drm files;
- multiple Spotify improvements, including the ability to pause Spotify tracks, improved handling of Spotify Top Tracks and more;
- added HipHop and Kuduro equalizers;
- remember current playlist between restarts;
- IDv3 tag lyrics support;
- added option to change the time step when seeking using the keyboard
- added "Smart Playlists" for Subsonic;
- new lyrics services: AZLyrics, bollywoodlyrics.com, hindilyrics.net, lololyrics.com, Musixmatch, Tekstowo.pl;
- updated to GStreamer 1.0;
- added AppData file for Clementine (for GNOME and KDE Software Centers);
- Ubuntu One, Discogs, Grooveshark and Radio GFM were removed;
- various improvements and and fixes.
For a complete changelog, see THIS page.
Install Clementine 1.3.0 in Ubuntu or Linux Mint
To install the latest Clementine in Ubuntu 14.04, 15.04, 15.10 or 16.04 / Linux Mint 17.x and derivatives, you can use its official stable PPA. Add the PPA and install Clementine using the following commands:
sudo add-apt-repository ppa:me-davidsansome/clementine
sudo apt-get update
sudo apt-get install clementine
Download Clementine
Go to link Download
Monday, October 31, 2016
Configure Razer Mice In Linux With Razercfg Ubuntu PPA
Configure Razer Mice In Linux With Razercfg Ubuntu PPA
Razer Synapse, the official Razer configuration utility, doesnt work on Linux however, theres a tool called Razercfg that allows configuring some of the Razer mice settings under Linux.

The application only includes options that are supported by the mouse hardware, like changing the DPI, scan frequency (polling rate) and led colors. So for instance if the hardware doesnt support button remapping, Razercfg wont offer this option. That also means that Razercfg doesnt support macros.
Razercfg also allows saving and easily switching between profiles (Desktop, FPS gaming, RPG gaming, etc.).
The latest stable Razercfg doesnt ship with a tray applet / AppIndicator, though such a feature should be added in the next release (0.34), and youll be able to use it to quickly switch between profiles.
Razercfg supports the following devices:
- Razer DeathAdder Classic
- Razer DeathAdder 3500 DPI
- Razer DeathAdder Black Edition
- Razer DeathAdder 2013
- Razer DeathAdder Chroma
- Razer Krait
- Razer Lachesis Classic
- Razer Naga Classic mouse
- Razer Naga 2012 mouse
- Razer Naga 2014 mouse
- Razer Naga Hex mouse
- Razer Taipan mouse
The following mice are listed as stable, but missing minor features:
- Razer Boomslang CE
- Razer Copperhead
- Razer Lachesis Classic
For a complete list of hardware features for each mouse, see the Razercfg homepage.
I also managed to add basic support for Razer Ouroboros mice (for both wired and wireless modes), based on this bug report, by using the Taipan code as a base (only basic features: enable/disable the leds and change the DPI and scan frequency). This is available if you use the packages available in the main WebUpd8 PPA or by downloading the Debian packaging (youll find the patch in the debian/patch folder).
Dont report bugs related to the Ouroboros on the Razercfg GitHub page since the app doesnt officially support it yet.
Install Razercfg in Ubuntu
Note that I only tested the packages in Ubuntu 16.04, which uses systemd, so Im not sure if it will work in Ubuntu 14.04.
Razercfg is available in the main WebUpd8 PPA, for Ubuntu 16.04, 15.10, 15.04 and 14.04. Add the PPA and install the application using the following commands:
sudo add-apt-repository ppa:nilarimogard/webupd8
sudo apt update
sudo apt install razercfgIf the application doesnt detect your mouse (and the device is listed as supported), try restarting the system and also see the first note below.
Important:
- if your system has an xorg.conf file (/etc/X11/xorg.conf), youll need to make sure it doesnt specify a device (you can comment out the "Device" section) or configure it to use a generic device. The Razercfg GitHub page explains this in detail;
- if the settings are not saved between system restarts, you can edit the /etc/razer.conf configuration file to specify various options and initial hardware configuration settings.
For other Linux distributions, see the Razercfg GitHub page.
Also see: How To Change The Mouse Scroll Wheel Speed In Linux Using imwheel.
Go to link Download
Saturday, October 22, 2016
Create A Bootable USB Stick On Ubuntu With GNOME Disks Quick Tip
Create A Bootable USB Stick On Ubuntu With GNOME Disks Quick Tip
[Quick tip] Ubuntu Startup Disk Creator has been known to be buggy at times, so users have been looking for alternatives. Well, some might not be aware of this, but theres another GUI tool already installed by default in Ubuntu (w/ Unity) and Ubuntu GNOME, as well as other GNOME-based Linux distributions, which allows creating a bootable USB stick: GNOME Disks.
GNOME Disks is reliable, very easy to use and should already be installed if you use Ubuntu with Unity or GNOME.
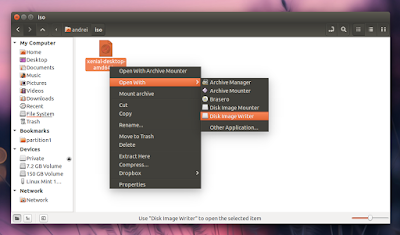
To create a live USB using GNOME Disks, open Nautilus, right click the Ubuntu (Fedora, etc.) ISO and select Open With > Disk Image Writer:
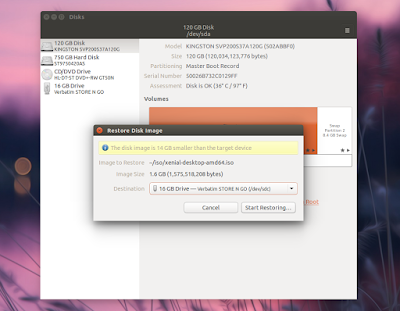
Next, simply select your USB drive as the Destination (and double check to make sure the drive you select under "Destination" is correct because the data on it will be destroyed!) and click "Start restoring...":
Note that this method doesnt support data persistence, so when starting up from this USB, the documents and settings will be discarded on shutdown.
And speaking of GNOME Disks and USB drives, you can also use this tool to format USB sticks, edit partition, create a disk image, change filesystem label and more.
In case youve removed GNOME Disks Utility or your Linux distribution doesnt provide it by default, install the "gnome-disk-utility" package. In Debian / Ubuntu (and derivatives), install it using the following command:
sudo apt-get install gnome-disk-utilityGo to link Download
Subscribe to:
Posts (Atom)